In this post, we’ll explore one of the new actions introduced in the first Encodian Flowr release 2025!
The ‘PDF – Insert Table of Contents‘ action can be found within the Encodian Flowr PDF connector. We will demonstrate how to add a dynamic table of contents to a PDF document by merging individual PDFs.
This solution uses this new Flowr action and the PDF – Merge Files action.
To deliver this example solution, I’ve created a PowerApp, which is aligned to the scenario of creating a single legal case PDF document ‘bundled’ from multiple PDF files. The high-level steps are:
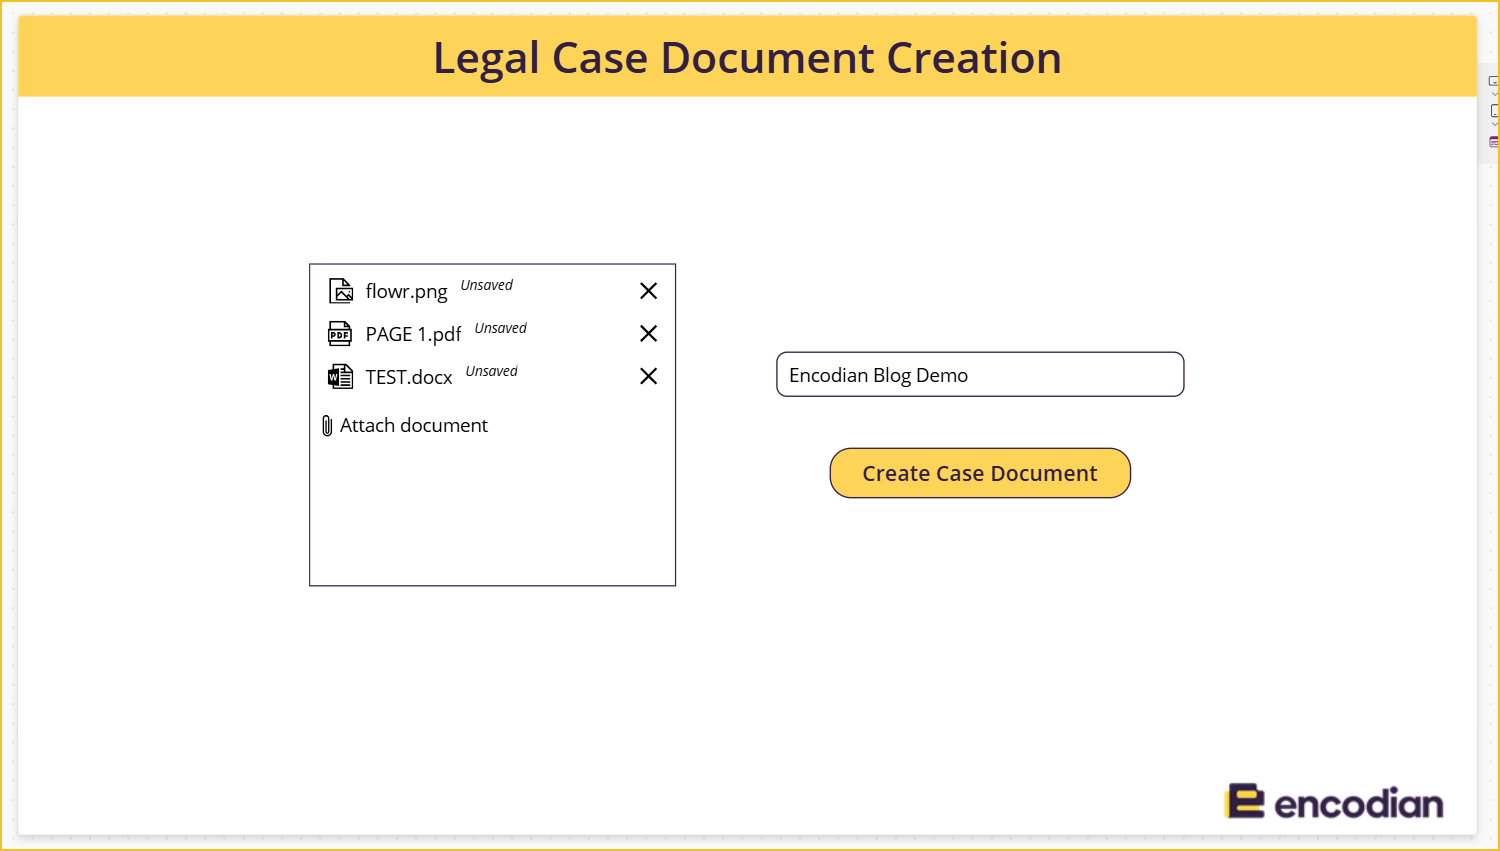
I have created a simple, one-screen Power App where users can upload documents they want to merge. The documents can be in any format because the PDF—Merge Files action can merge non-PDF documents. Non-PDF documents are silently converted to PDF as part of the merge process.
The user must also provide a client name; if no name is provided, the submit button will be disabled.
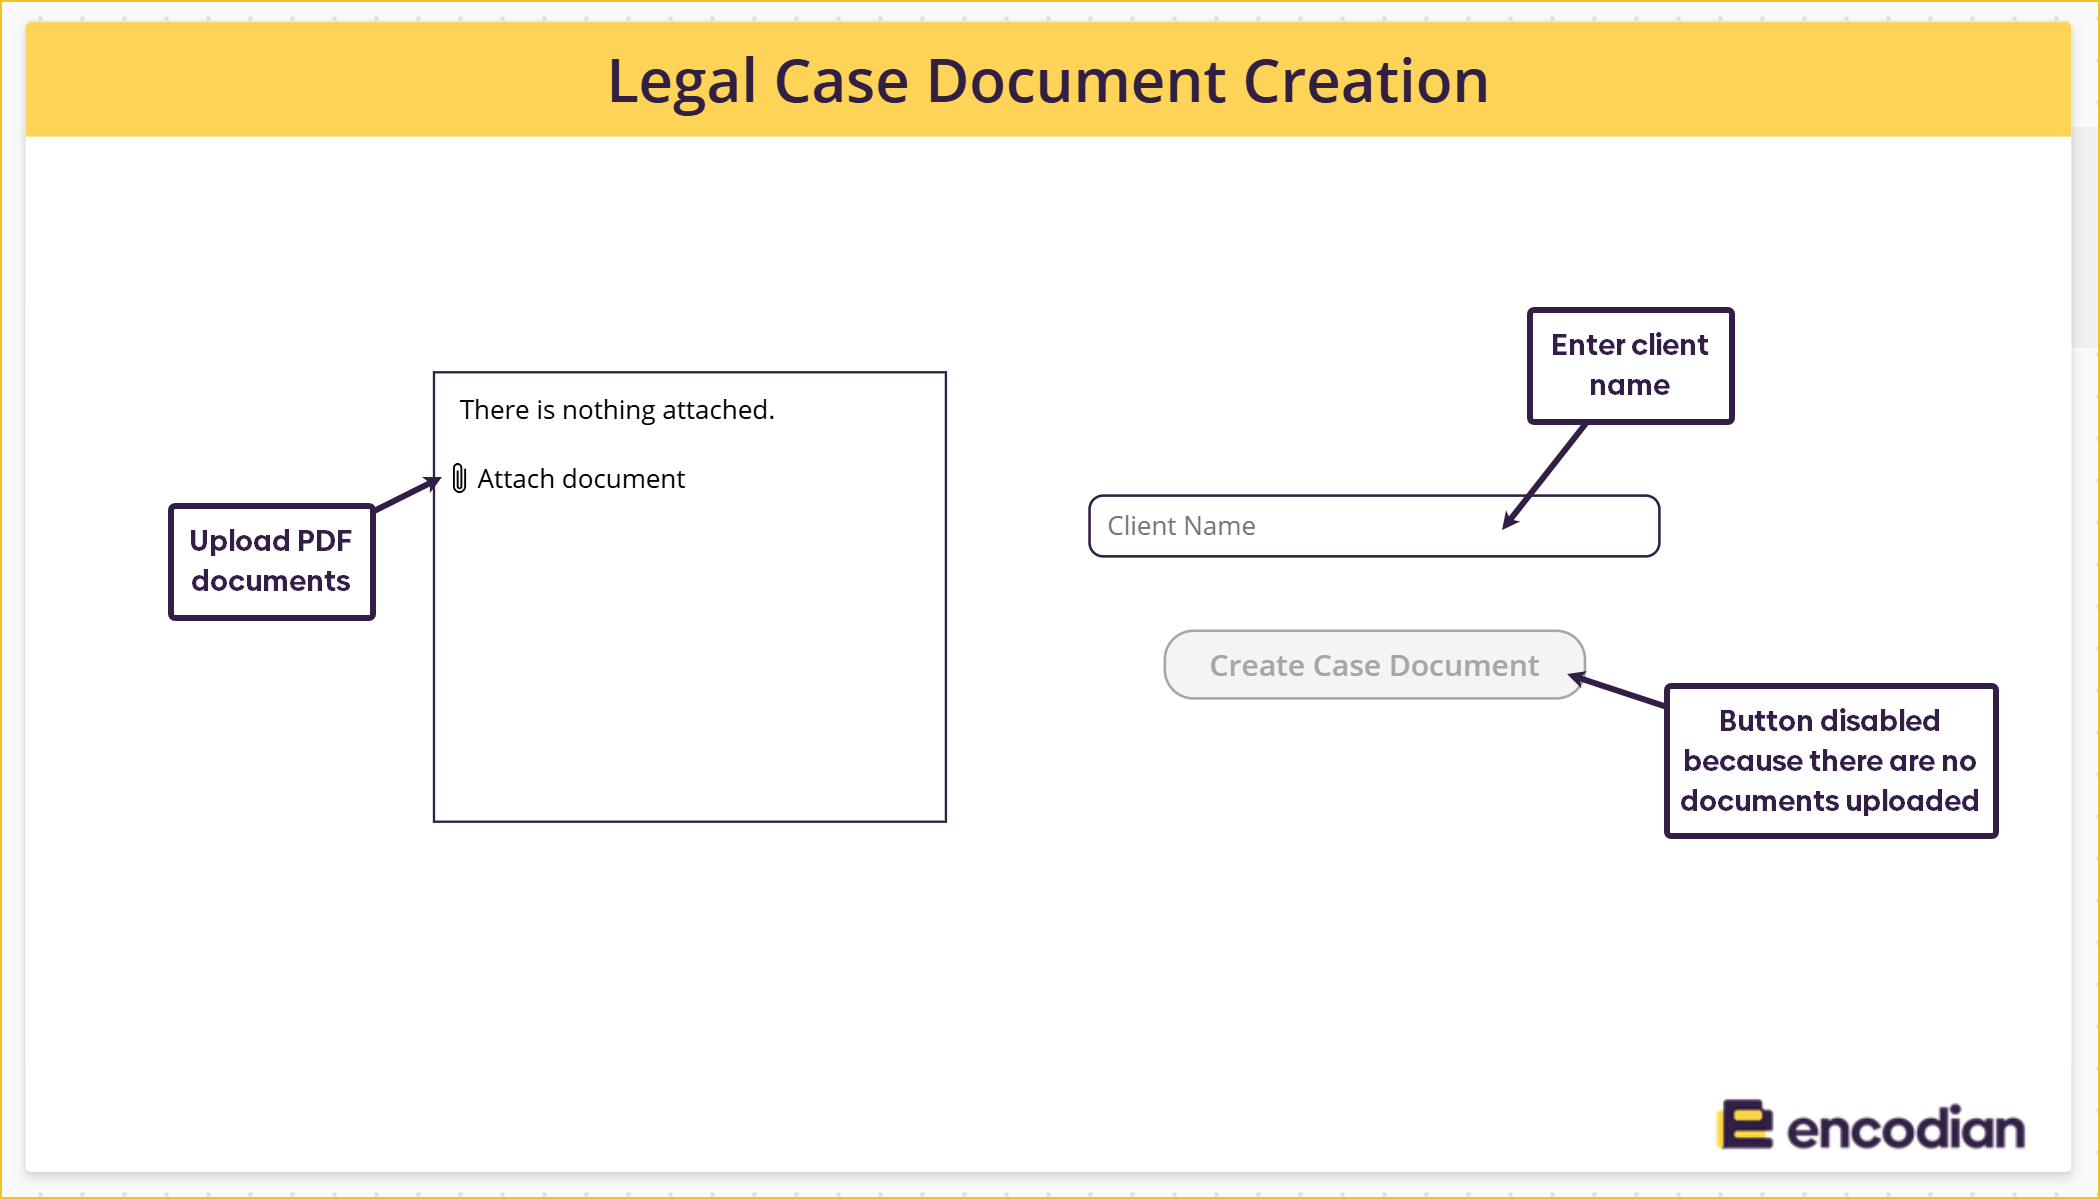
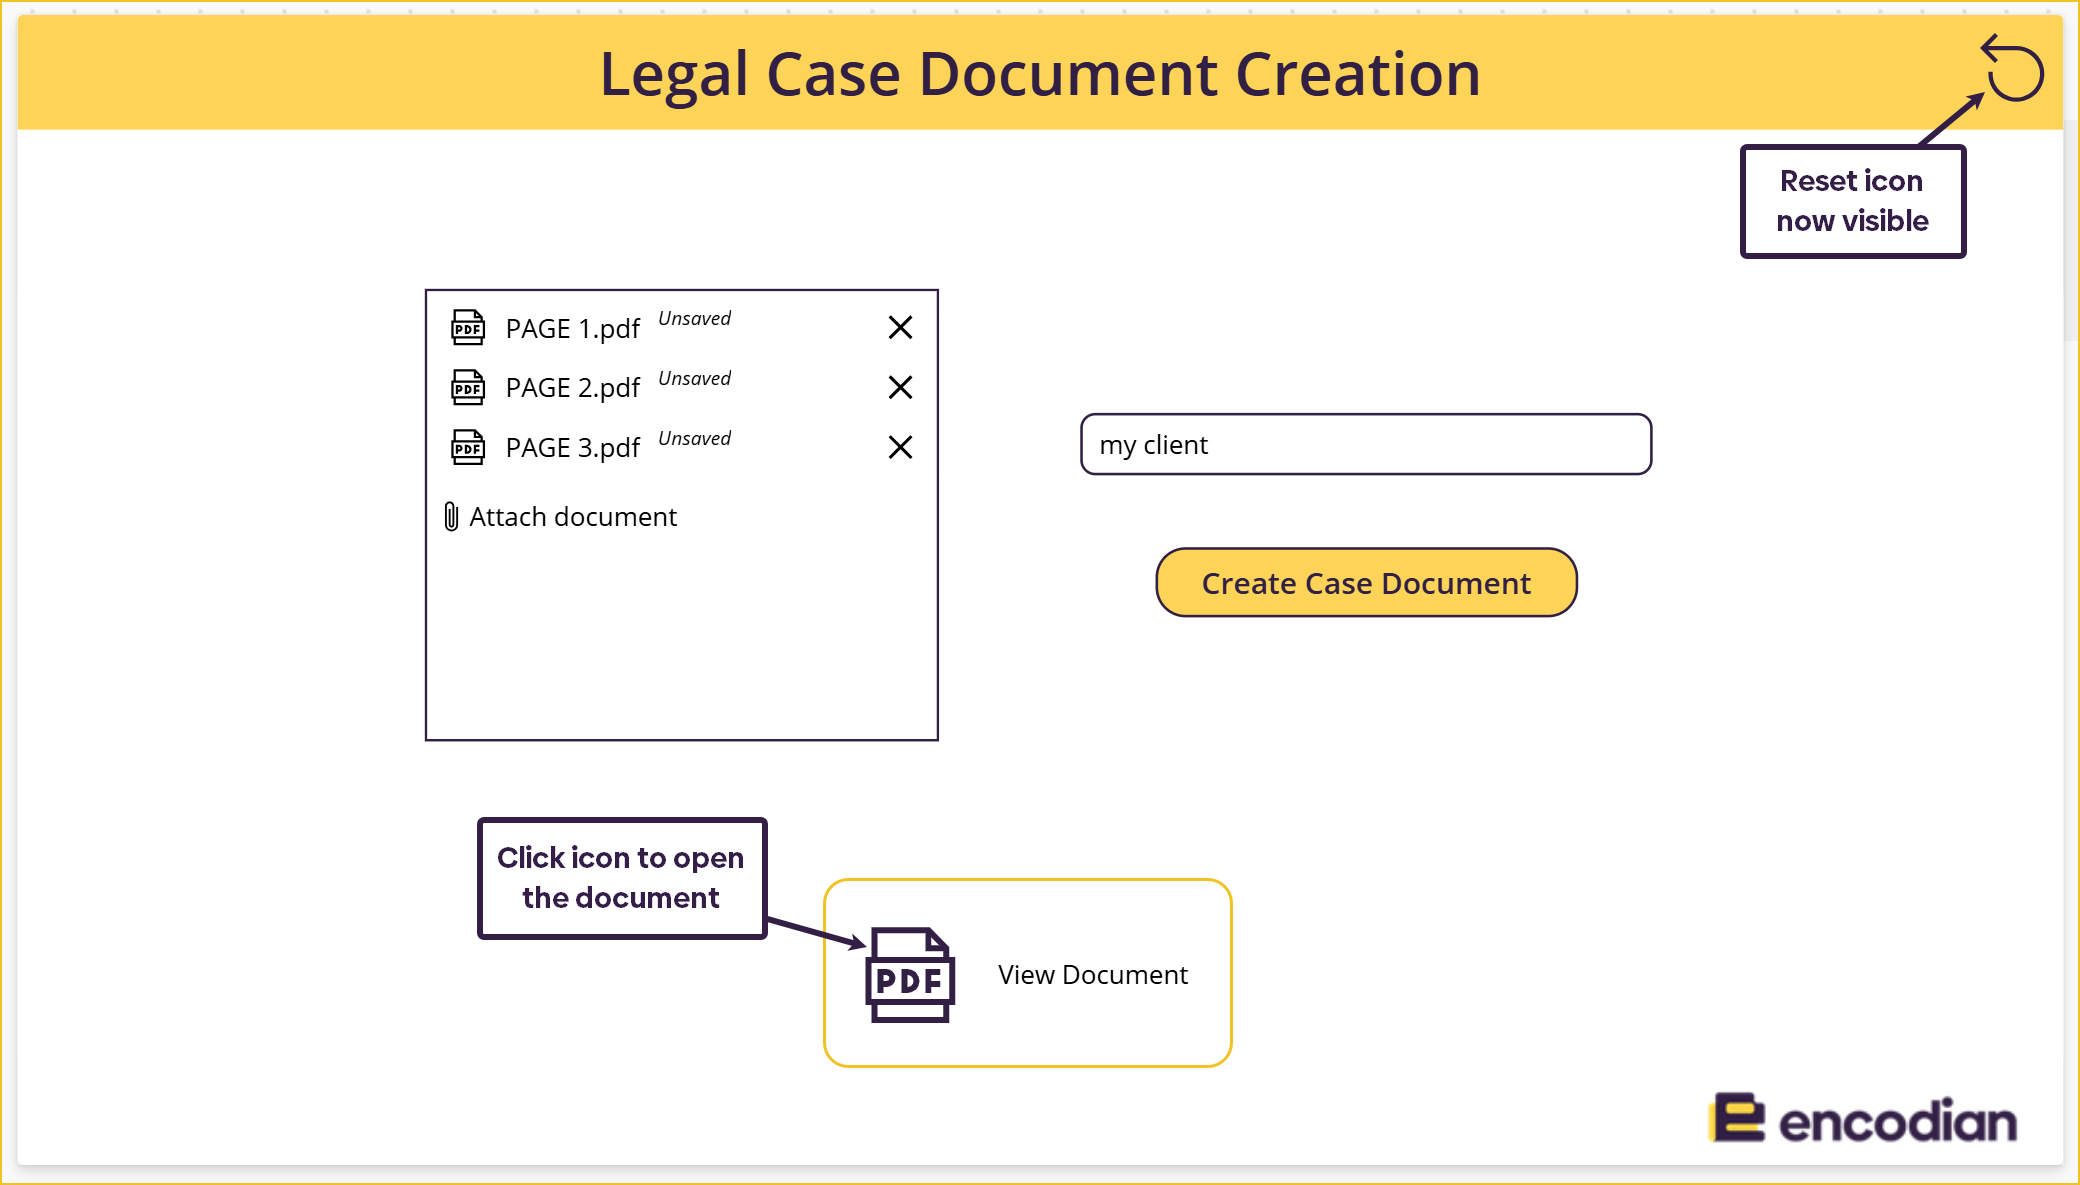
When the ‘Create Case Document‘ button is pressed, it triggers a Power Automate flow, which executes the generation of the single PDF document. Upon completion, the flow returns a link to the final PDF document to the app, allowing the user to open it immediately.
We followed a YouTube tutorial from Reza Dorrani to implement the functionality of uploading documents to the attachment control and preparing them to be sent to Power Automate. I will go through the steps in this blog; however, you can watch the original video at the link below!
This method allows you to send multiple attachments to Power Automate as a single input rather than triggering the flow separately for each document. This is necessary because we need one flow to merge all the documents.
We need to format the added attachments so that we can send them to Power Automate. We can achieve this using collections and a hidden gallery.
The OnAddFile and the OnRemoveFile properties of the attachment control both use this formula:
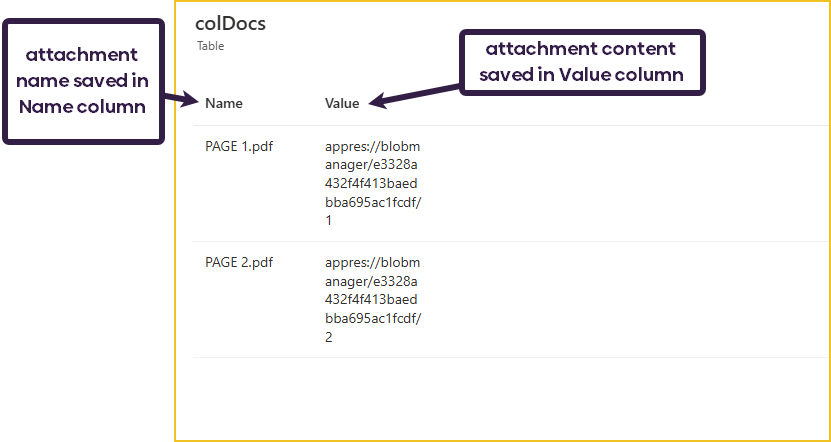
ClearCollect(
    colDocs,
    uploadFiles.Attachments
);
This means that whenever a file is added or removed, the colDocs collection is cleared, and all the added attachments are re-added.
This is what the colDocs collection looks like:
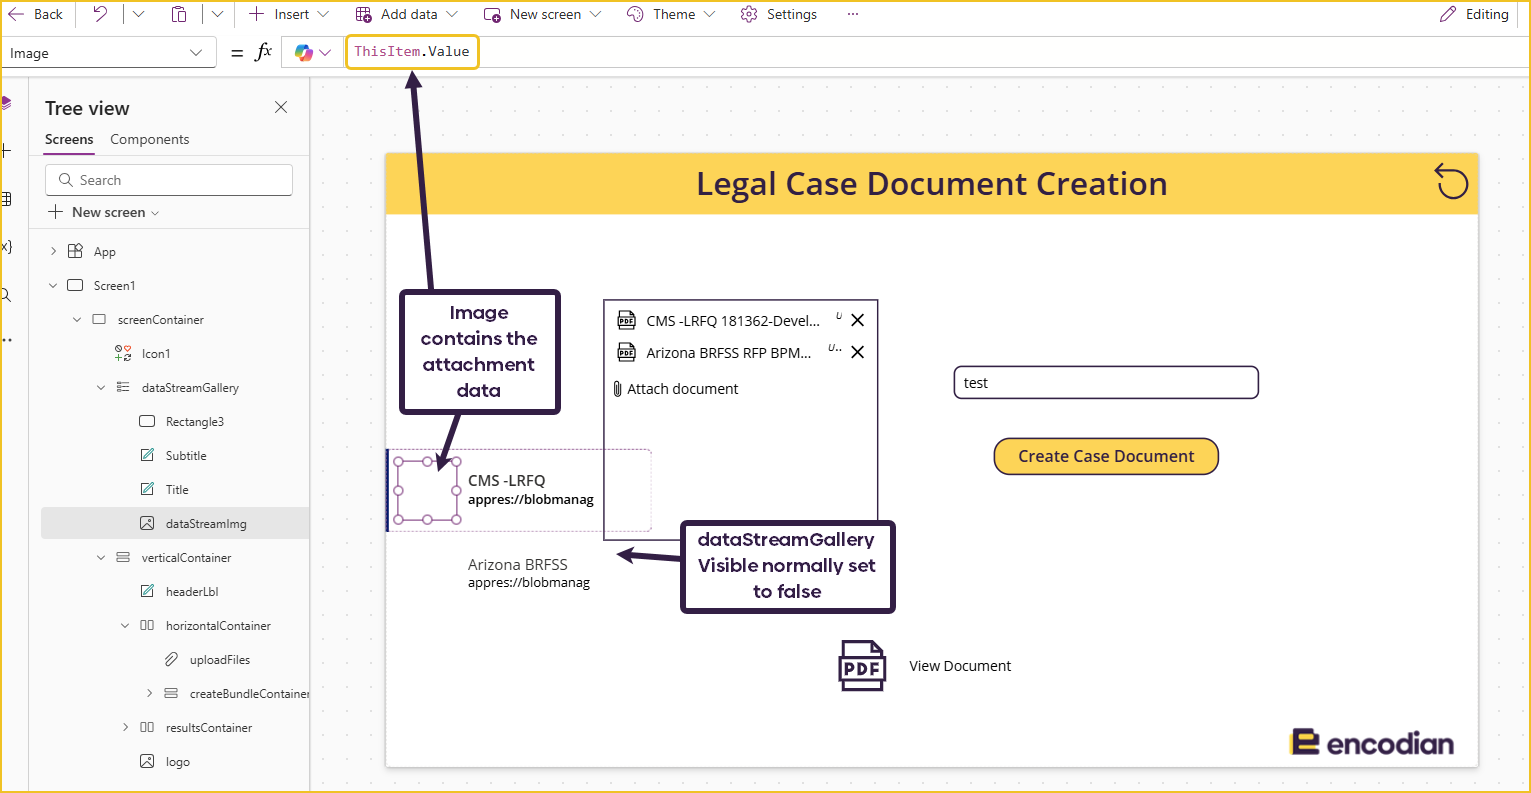
On the screen, I have a hidden gallery called dataStreamGallery. The Items property of this gallery is set to colDocs. It is important that this gallery contains an Image control, with its Image property set to:
ThisItem.Value
That will set the image to the attachment value. It doesn’t matter if the attachment isn’t an image, we just need to do this step to convert the attachment value into a format for Power Automate.
The OnSelect property of the ‘Create Case Bundle‘ button uses these formulas:
Clear(colDocGal);

ForAll(
    dataStreamGallery.AllItems,
    Collect(
        colDocGal,
        {
            Title: Title.Text,
            dataStream: dataStreamImg.Image
        }
    )
);

Set(varDocLink, PDFTableofContents.Run(clientNameTxtInput.Text, JSON(colDocGal, JSONFormat.IncludeBinaryData)).doclink)
When the button is pressed, we collect all the items in the hidden gallery and put them into a new collection called ‘colDocGal’. We store the document name as ‘Title’ and the document content as ‘dataStream’. Placing the document into the gallery’s Image control converts the original blob storage link into a data stream link that Power Automate can use.
The following formula runs the flow and saves the returned value as the variable ‘varDocLink’. When running the flow, we use the JSON formula to convert ‘colDocGal’ into a JSON so we can send it to Power Automate. The returned value will be the SharePoint link to the final PDF document.
The ‘Clear’ formula ensures that ‘colDocGal’ variable is empty before we start populating it.
ClearCollect(
    colDocs,
    uploadFiles.Attachments
);
If(
    Or(
        IsEmpty(uploadFiles.Attachments),
        IsBlank(clientNameTxtInput.Text)
    ),
    DisplayMode.Disabled,
    DisplayMode.Edit
)
Two things are controlling the display mode of the button:
Clear(colDocGal);

ForAll(
    dataStreamGallery.AllItems,
    Collect(
        colDocGal,
        {
            Title: Title.Text,
            dataStream: dataStreamImg.Image
        }
    )
);

Set(varDocLink, PDFTableofContents.Run(clientNameTxtInput.Text, JSON(colDocGal, JSONFormat.IncludeBinaryData)).doclink)
The visibility of this container is controlled by the variable ‘varDocLink’ by the following formula:
!IsBlank(varDocLink)
The OnSelect property of this icon launches the link stored in the varDocLink variable:
Launch(varDocLink)
This icon only becomes visible once the document bundle has been created. It resets all the fields on the page.
!IsBlank(varDocLink)
Reset(uploadFiles);
Reset(clientNameTxtInput);
Set(varDocLink, Blank())
Two approaches to building this flow can be used depending on the document to which you are adding the table of contents.
If (per this example) you are merging documents before adding the ‘Table of Contents, ‘ you can pass the merged file from the ‘PDF – Merge Documents’ action directly to the ‘PDF – Insert Table of Contents’ action. This works because the ‘PDF – Merge Documents’ action automatically creates a bookmark for each merged file, which the ‘PDF – Insert Table of Contents’ action can then use to create the ‘Table of Contents’ automatically.
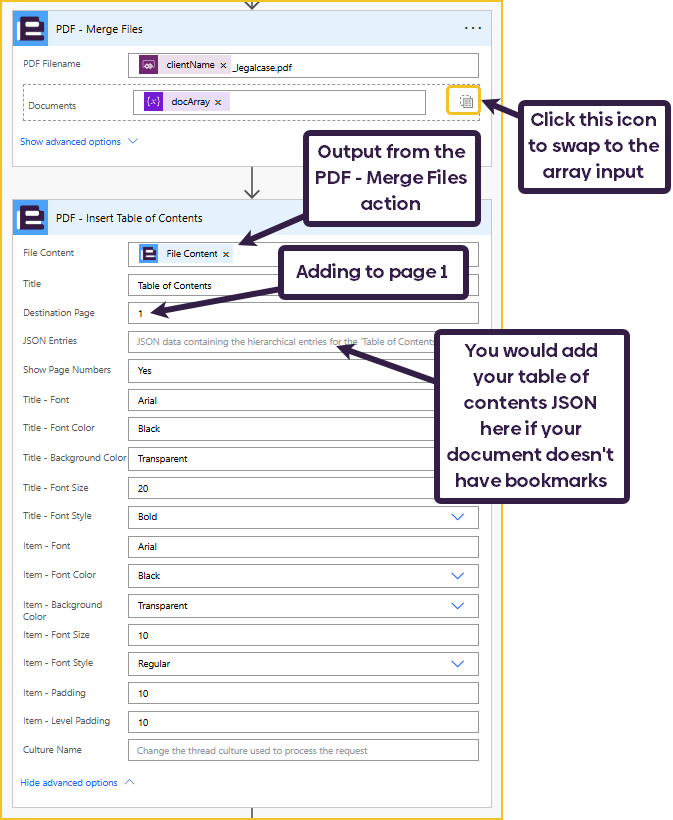
If the PDF document you are sending to the ‘PDF – Insert Table of Contents’ action doesn’t contain bookmarks, you can build and provide a JSON dataset that represents the ‘Table of Contents’ entries that are processed and used to create the ‘Table of Contents’ within the PDF document provided.
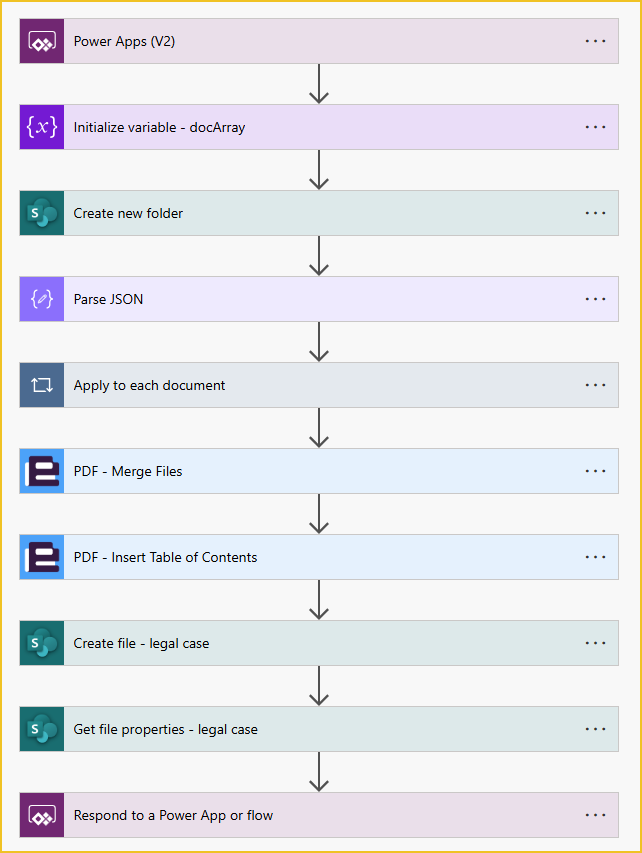
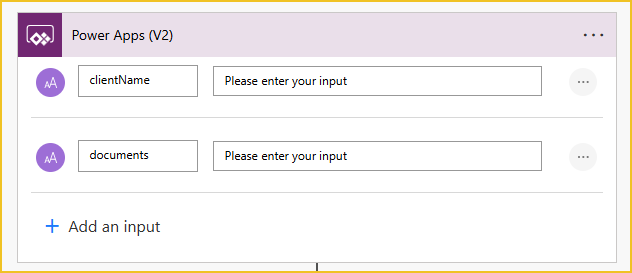
The Power Automate flow is triggered by the Power App, so the ‘Power Apps (V2)’ trigger is used. There are two text input values:
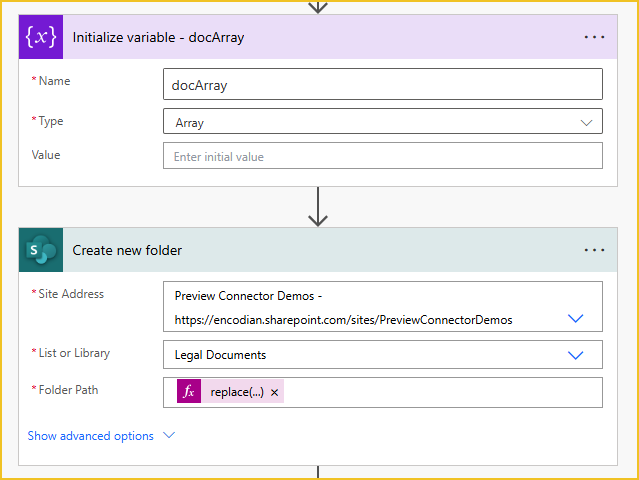
I am initialising one array variable called ‘docArray’. This variable will contain the file content of the documents to merge.
The created document bundle and the individual documents will be saved in SharePoint within a dedicated folder created using the ‘Create new folder’ action. I am using the replace expression for the folder path to replace any spaces with an underscore, this helps prevent this action from failing. The expression used is:
replace(triggerBody()['text'], ' ', '_')
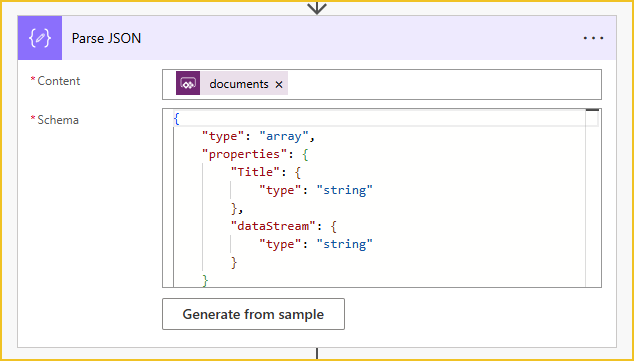
Before we can use the JSON data provided by the Power App, we need to parse it using the ‘Parse JSON‘ action. The content will be the documents input variable that we defined in the trigger action. If you have used the same column names for the collection ‘colDocsGal’ in the Power App, then the Schema will look like this:
{
    "type": "array",
    "properties": {
        "Title": {
            "type": "string"
        },
        "dataStream": {
            "type": "string"
        }
    }
}
If you used different column titles, just replace the ones I have used.
Now, we can loop through each document by iterating over the ‘Body’ output of the ‘Parse JSON‘ action.
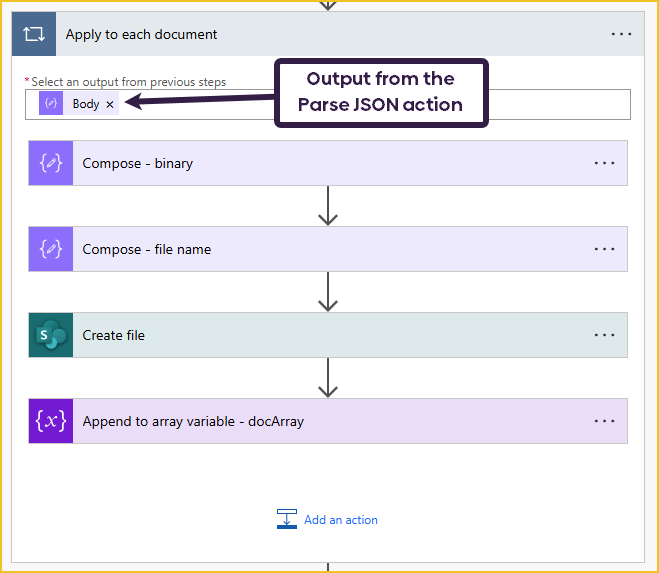
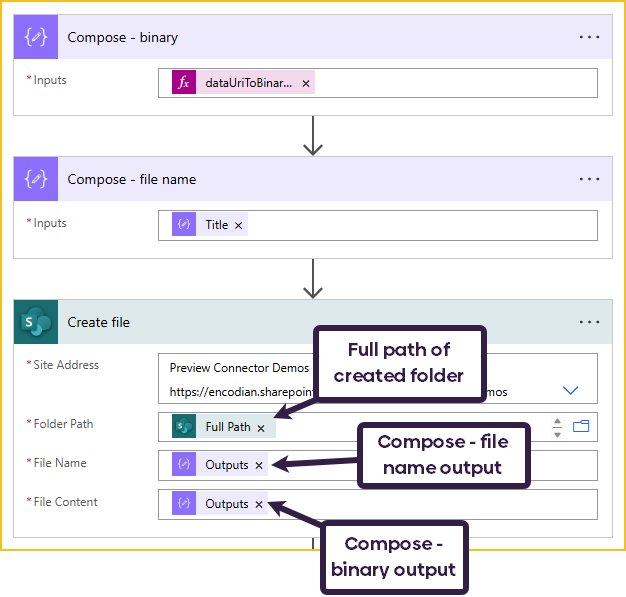
The first step is composing the file content of the document using the following expression:
dataUriToBinary(items('Apply_to_each_document')?['dataStream'])
This will convert the document to its binary value, which we can then save to SharePoint.
I am also composing the document’s name. After that, I can create the file in SharePoint using the ‘Create file‘ action. The file will be saved in the folder we created in the previous step. This process saves each individual document; we will work on the merged document afterward.
Next, I append the ‘fileName’ and the ‘fileContent’ to the docArray. We will use this array when merging the documents.

Once we have finished looping through each document, we will have a complete ‘docArray’. We will use these in the next two actions.
Firstly, we need to merge all the documents stored in the ‘docArray’ into a single PDF document. We will do this using Flowr’s PDF – Merge Files action. This action will automatically convert all the documents provided to PDF, so you don’t need to do a separate conversion first.
After merging the documents, we can insert the ‘Table of Contents’ using Flowr’s PDF – Insert Table of Contents action. This action offers various styling options, but I have left these inputs as the defaults.
Because the PDF – Merge Files action already added bookmarks to my document, all I need to provide is the ‘File Content’, Title, and Destination Page. The action will use the contained PDF bookmarks to build the ‘Table of Contents’.
If your document doesn’t have bookmarks, you will need to build up a JSON dataset like this:
{
"Title": "Name of section",
"Destination": "Page number section starts",
"Level": "1",
"Children": []
}
The Title is the section’s name as it will appear in the table of contents.
The Destination is the page number where the section starts.
The Level determines the bookmark’s level. If you are using level 2 or more bookmarks, the data for these bookmarks will be put in the Children array.
You would need to build up this JSON for each section of your document.
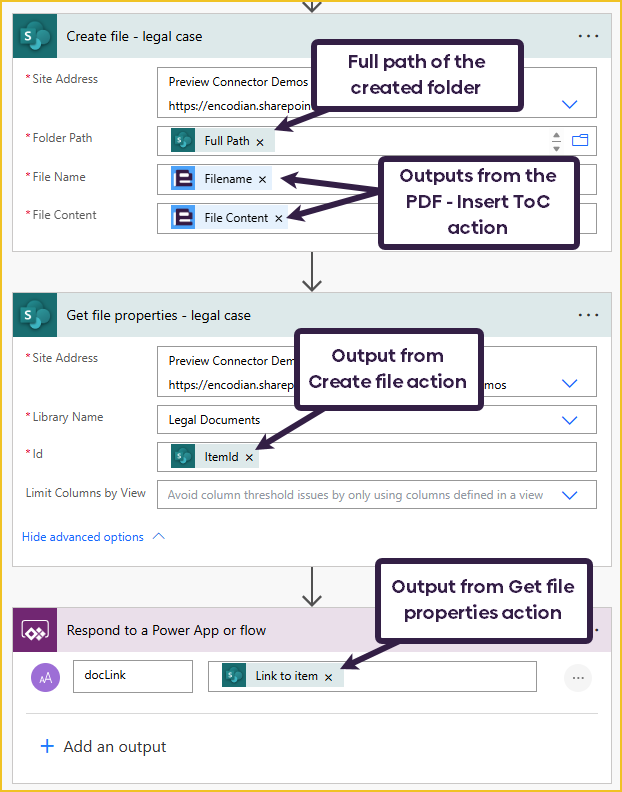
The last thing to do is create the final document in the SharePoint folder. Once the file is created, we need to use the SharePoint ‘Get file properties’ action to return the document link to Power Apps.
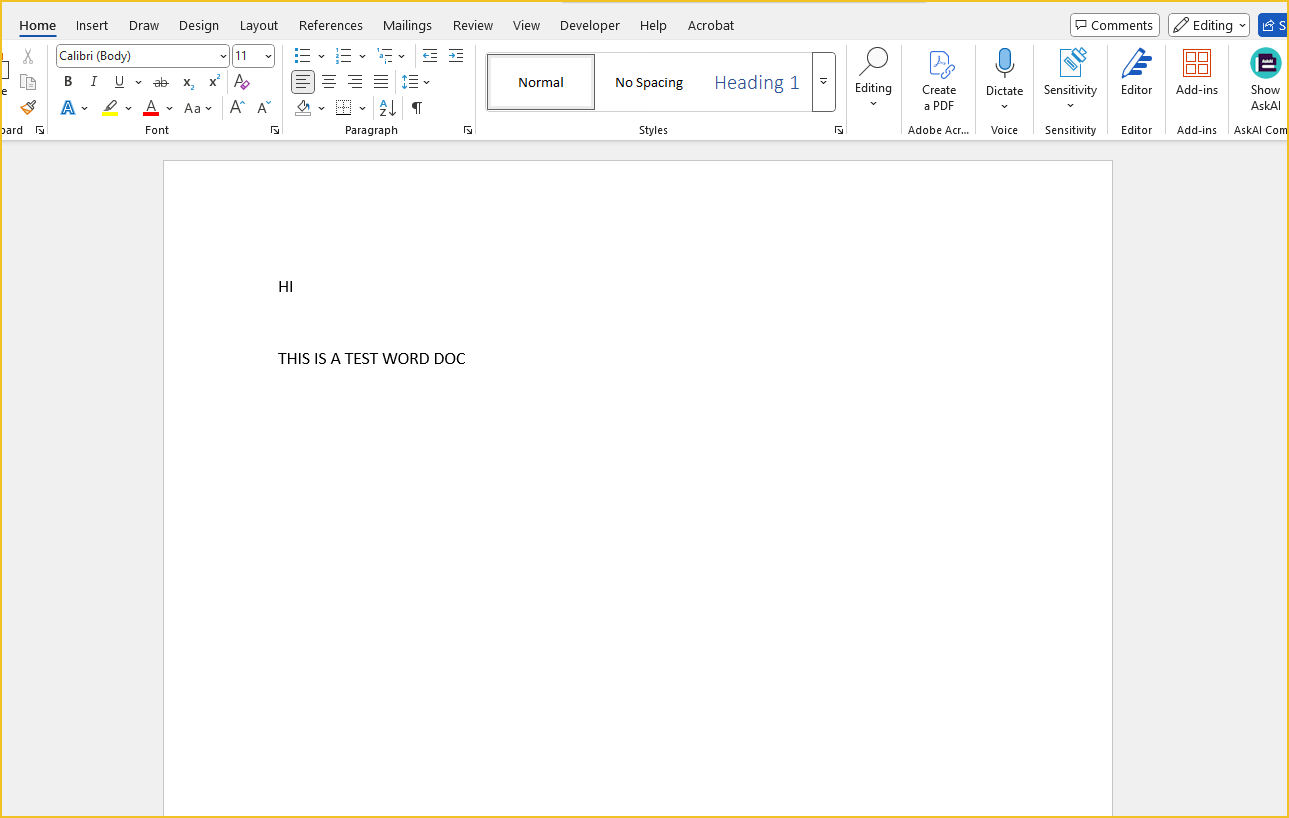
I have uploaded to the Power App three different document types: a PDF, an image, and a Word document.

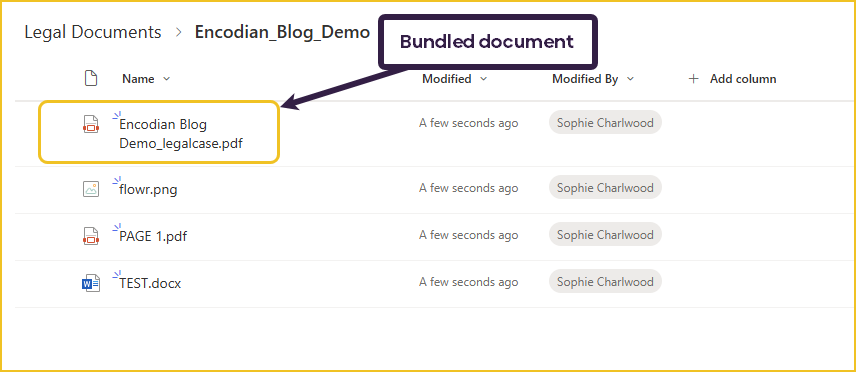
This is the resulting folder and files created in SharePoint:
This is the bundled PDF document in a two-page view. We can see that each file has been converted into PDF and merged correctly.

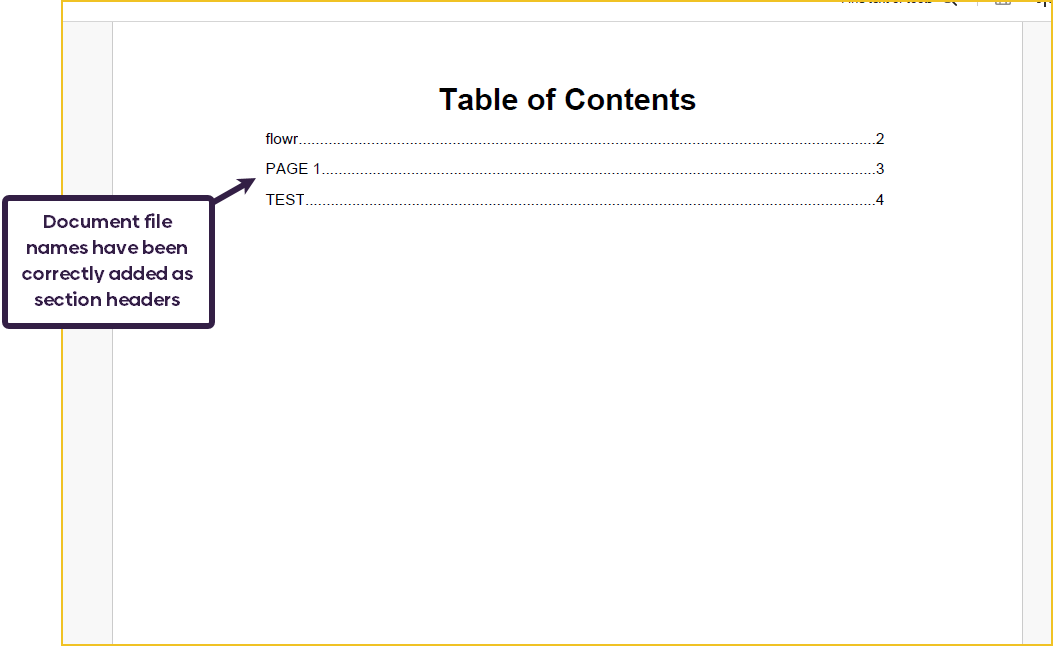
This is the table of contents that has been added to the merged documents. We can see that each document includes the correct page number.
Save time with 200+ actions across 9 connectors
Sign up for your free 30-day trial; no cards, catches, or contracts.
Don’t struggle! Try out our Premium Support packages today.
Technical Evangelist

