Need to automate receipt processing? In this blog, we’ll show you how to use the AI – Process Receipt action from Flowr to extract data from a receipt image using Power Automate and Power Apps. This solution stores receipt data in Dataverse, presents it in a responsive Power App, and allows users to upload or snap photos of receipts—ideal for automating expense tracking.
Rather watch the video?
This solution uses Dataverse as the backend data storage. Two tables are used:
There can be multiple receipt items per receipt, so the relationship is many-to-one (M:1). The Receipt Item’s rows are linked to the main receipt via a look up field.
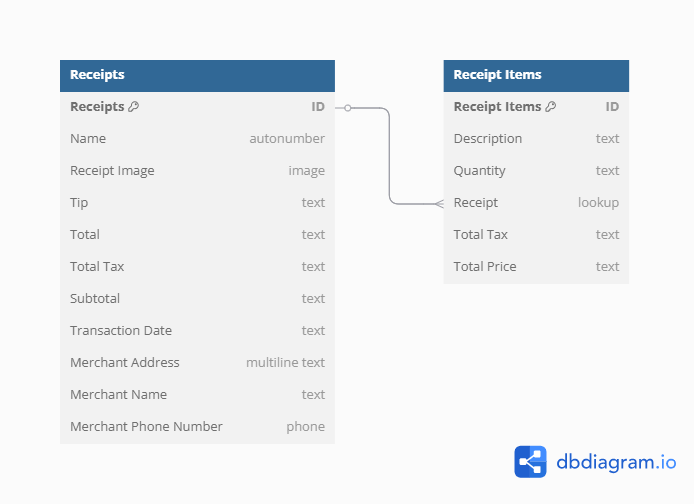
Most of the extracted data fields are set to text format in Dataverse because every receipt is different, and the formatting of values differs between them. For example, if your Transaction Date field is set to Date format, uploading a receipt with the date in dd-MM-yyyy format will cause Power Automate to fail because this format cannot be converted natively to a Date to save into the Dataverse column. This will make the Power Automate fail because this format can’t be converted natively to a Date format to save into the Dataverse column. Setting the data formats to Text in the backend means that the extracted data displays in the Power App exactly as it appears on the receipt and prevents flow failures. Of course, you can add extra formatting in Power Automate or Power Apps if required.
The home screen of the Power App contains a gallery that displays all the expenses you’ve uploaded. The gallery is filtered using the current user’s Entra ID, ensuring that users can only see their own receipts.
Filter(Reciepts, 'Created By'.'Azure AD Object ID' = User().EntraObjectId)
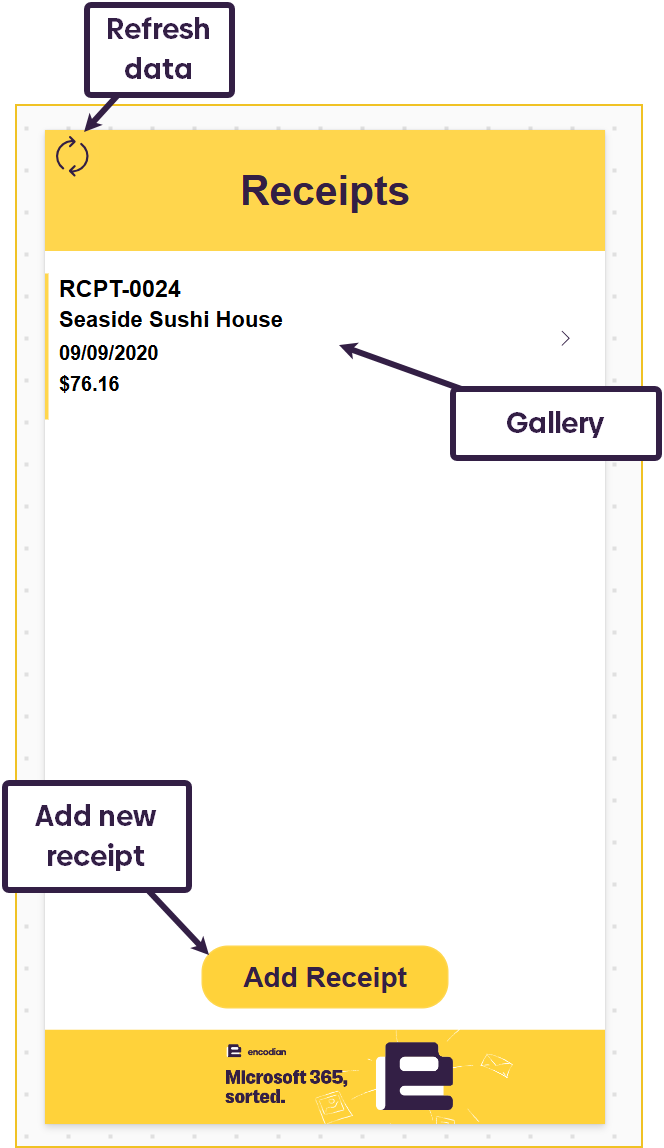
The ‘Add Receipt’ button navigates to the Upload Receipt page. Here, users can either upload an image of their receipt or take a photo of it. Each button makes a different container visible with the respective controls inside the container:
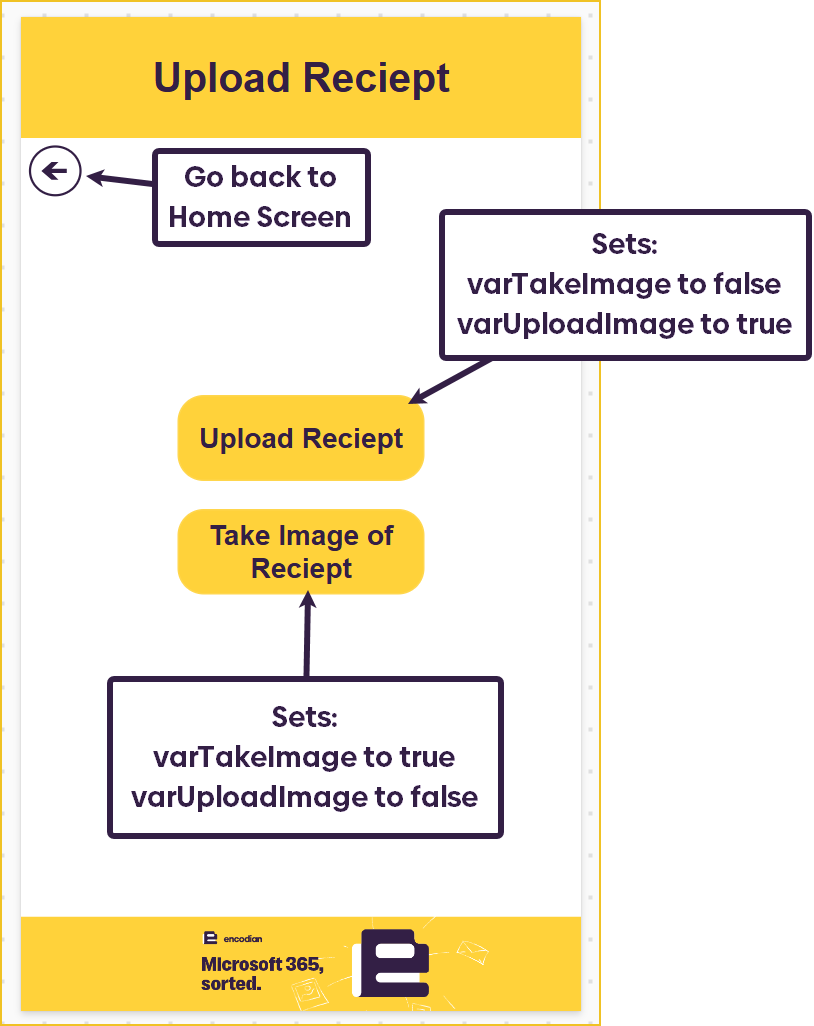
For full details on how the upload image and take image controls work, please look at the instructions on one of our previous blogs below.
For full details on how the upload image and take image controls work, please look at the instructions on one of our previous blogs below.
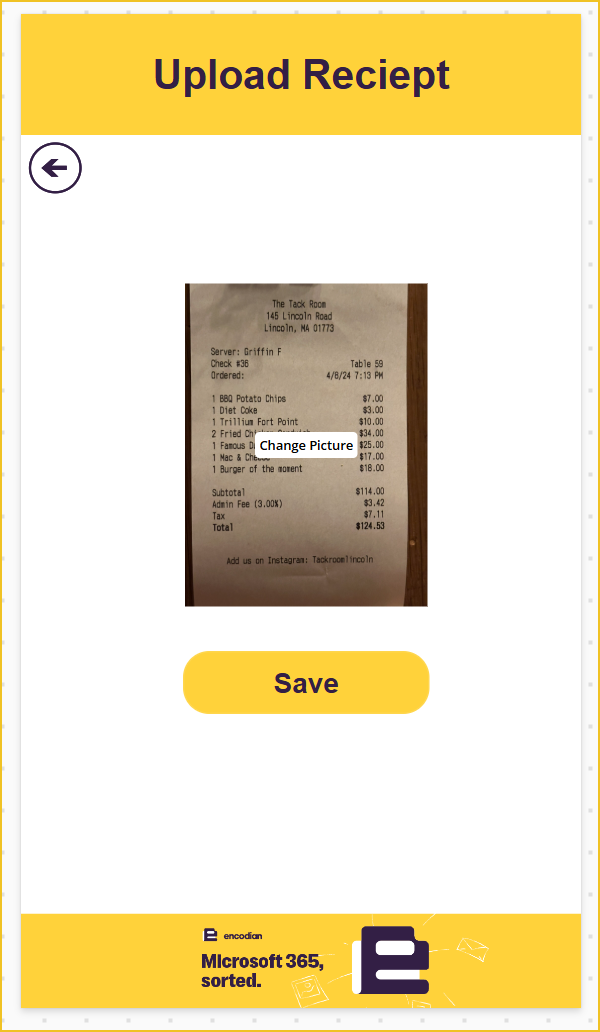
Once a receipt has been uploaded/taken, the Save button becomes enabled. When pressed, it creates a new row in the Receipts table and adds the uploaded/taken image to the ‘Receipt Image’ column.
Patch(Reciepts,Defaults(Reciepts),{'Receipt Image': UploadedImage1.Image});
Reset(AddMediaButton1);
Navigate(homeScreen)
The display mode formula of the Save button is:
If(IsBlank(AddMediaButton1.Media), DisplayMode.Disabled, DisplayMode.Edit)
After saving the receipt, once the data is refreshed it will appear in the gallery. Initially, the gallery will only display the receipt number. This is because the Power Automate flow that is extracting the data from the receipt is still working in the backend. Once the flow has finished, the extracted data will be visible in the app.

If we open up the added receipt, we can see a Power Apps form that contains all the extracted data. The form is connected to the Receipts Dataverse table. Because different receipts contain different data, any fields from the table that weren’t populated are hidden from the form to maximise the space. The following formula is being used on each form DataCard visibility property (the DataCardValue must correspond to the DataCard this formula is being added too).
If(IsBlank(DataCardValue7.Value), false, true)
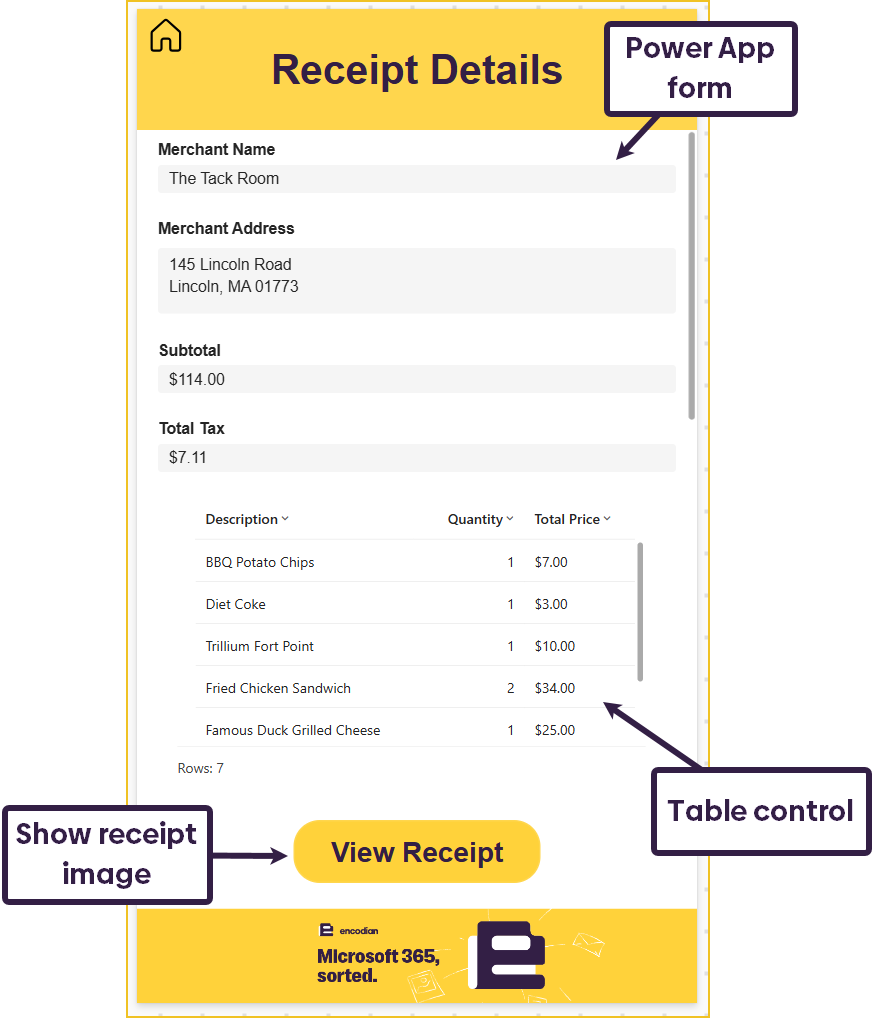
The table control uses the Receipt Items table as its datasource. The data is filtered for the current selected receipt.
Filter('Receipt Items', Receipt.Reciepts = receiptGallery.Selected.Reciepts)
The ‘View Receipt’ button makes a container visible that contains the uploaded receipt image. This means the extracted data can be compared to the real data on the receipt. When the receipt image container is visible, the same button is also used to close the container. The visibility of the container is being controlled by a variable called varShowReceipt.
The button’s OnSelect property:
If(varShowReciept, Set(varShowReciept, false), Set(varShowReciept, true))
If(varShowReciept,"Close Receipt", "View Receipt")
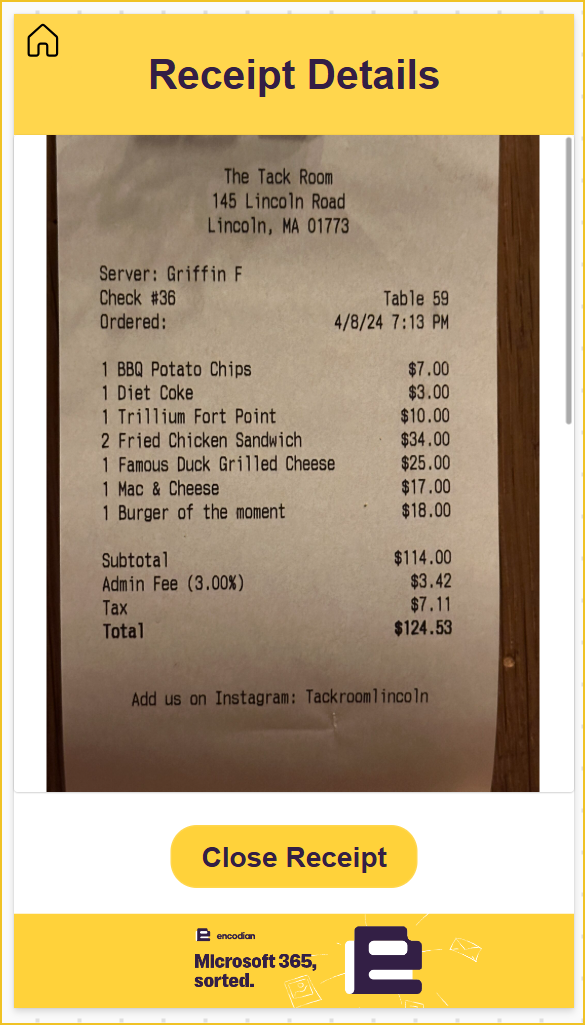
Because the image is being saved to Dataverse, we need to access the full size image, otherwise it will display blurry. We can do this by using this formula in the Image control:
$"https://[environmentURL]/Image/download.aspx?Entity=[entityLogicalName]&Attribute=[imageColumnLogicalName]&Id={receiptGallery.Selected.Reciepts}&Full=true"
So my formula looks like:
$"https://org67b56a92.crm11.dynamics.com/Image/download.aspx?Entity=en_reciepts&Attribute=en_receiptimage&Id={receiptGallery.Selected.Reciepts}&Full=true"
The flow is triggered when a new row is added to the Receipts table in Dataverse. Using the Patch function, this happens when the Power App saves the receipt image.
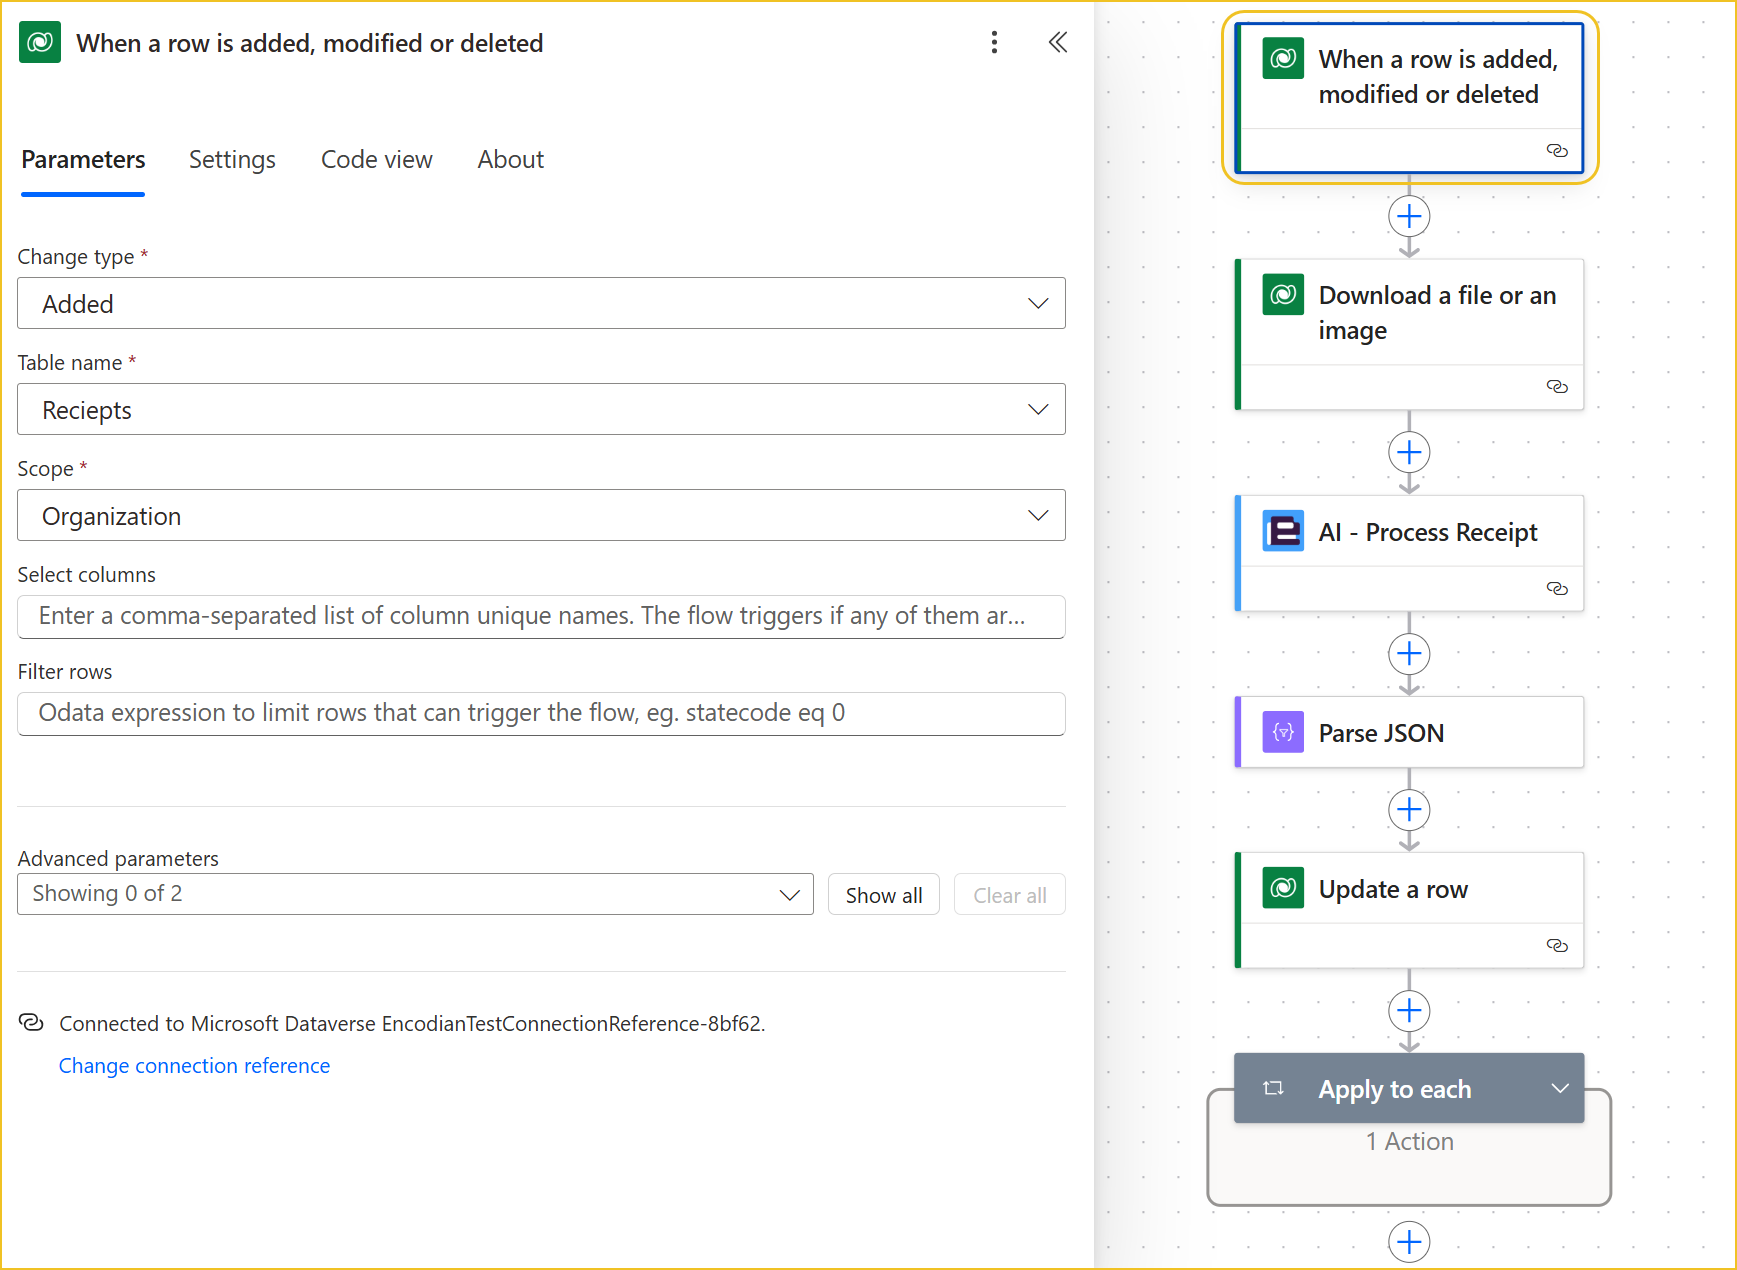
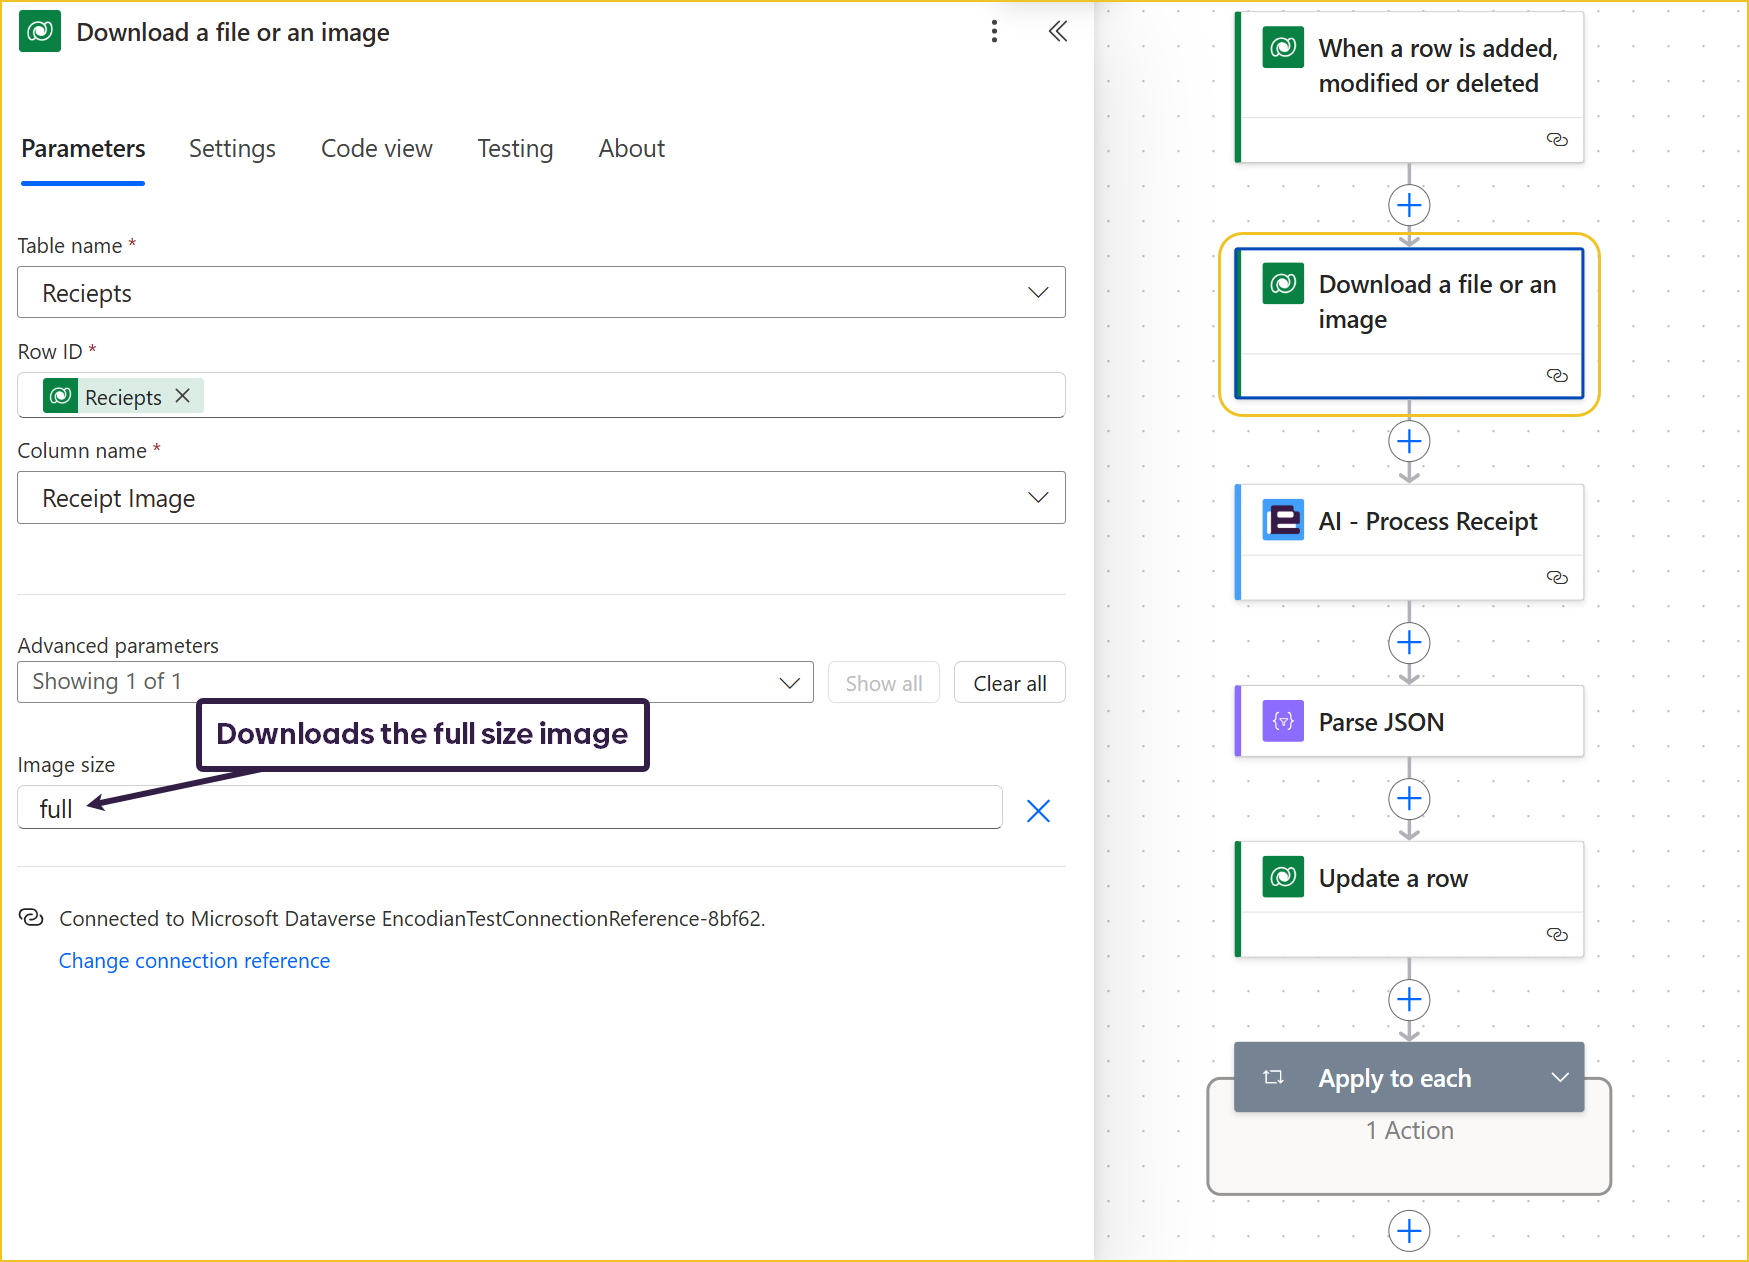
To ensure high-quality AI processing, the flow downloads the full-size image of the receipt.
Use Flowr’s AI – Process Receipt action, passing the image content as input.
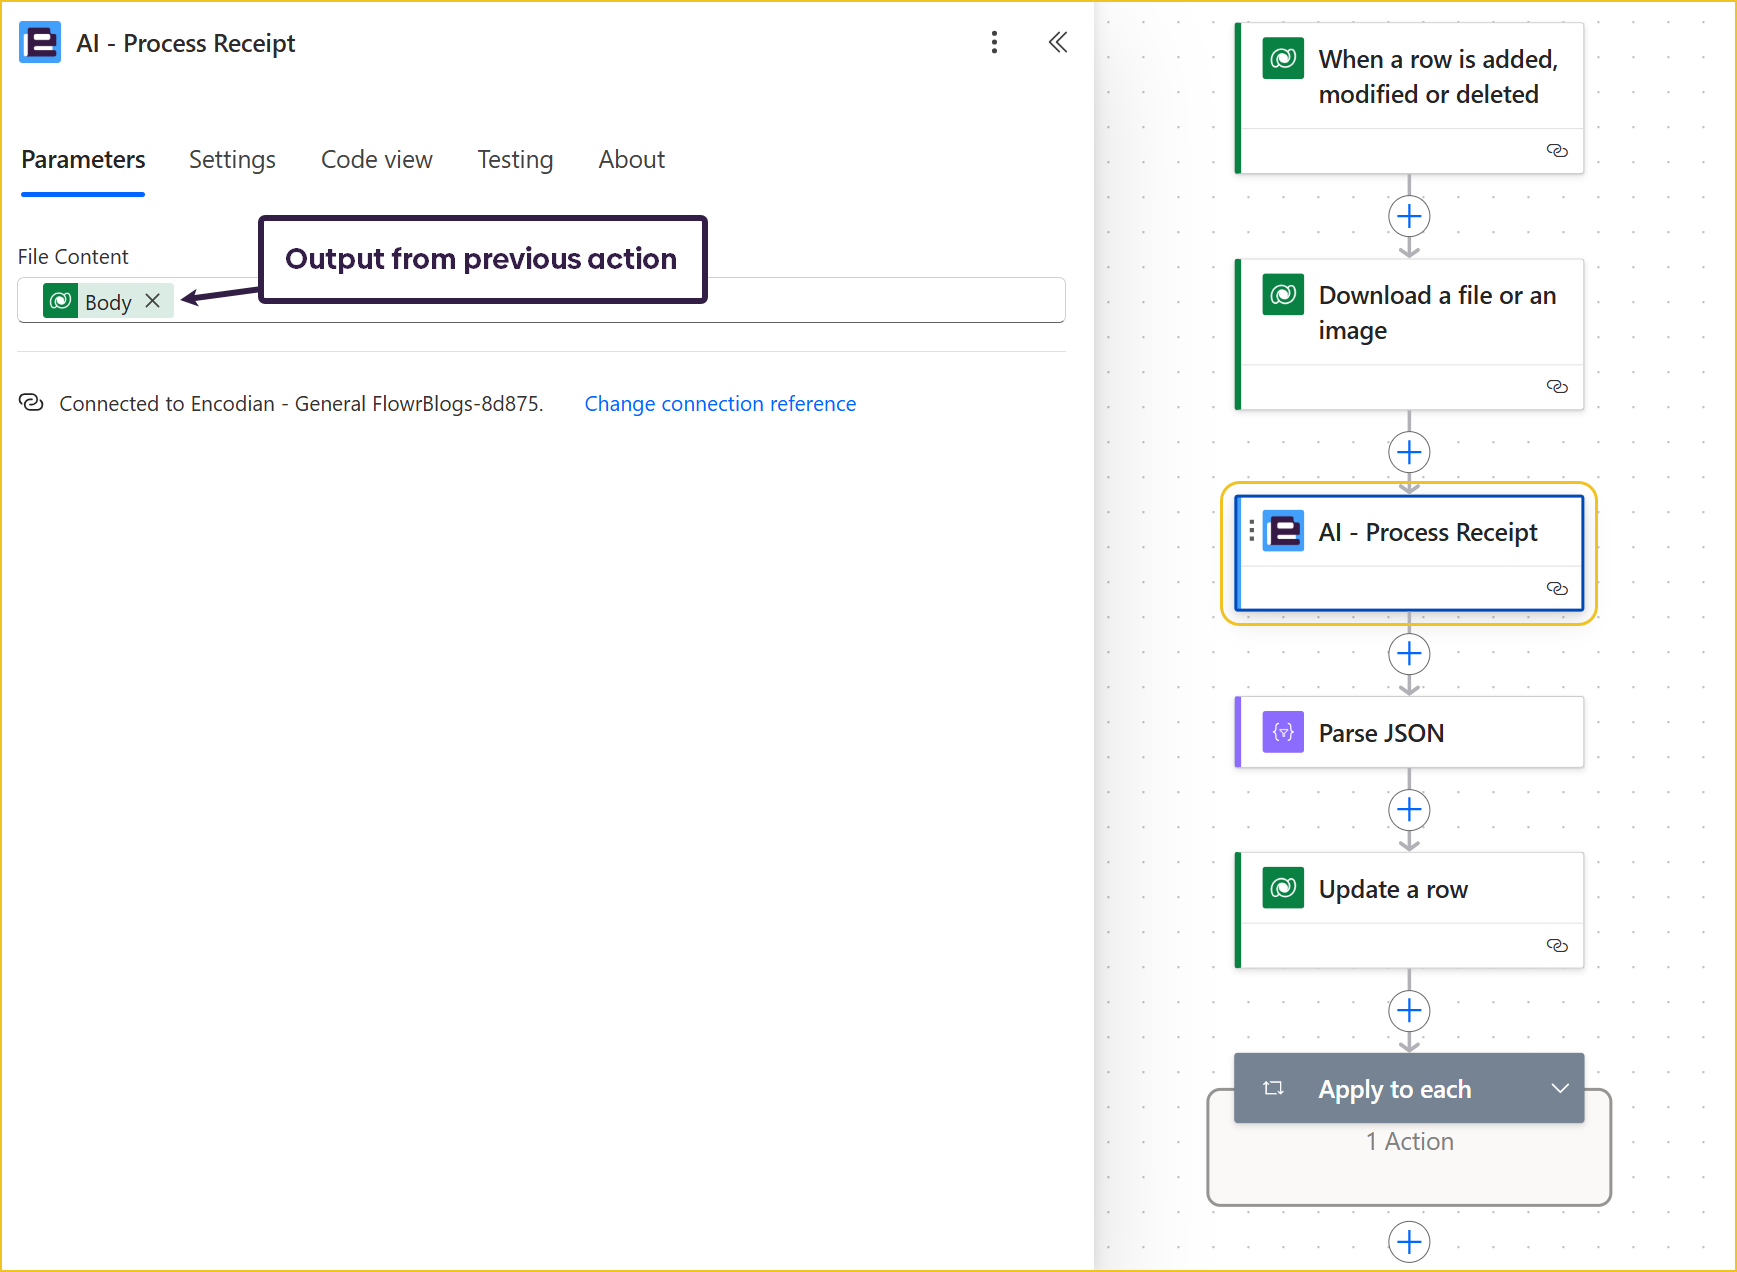
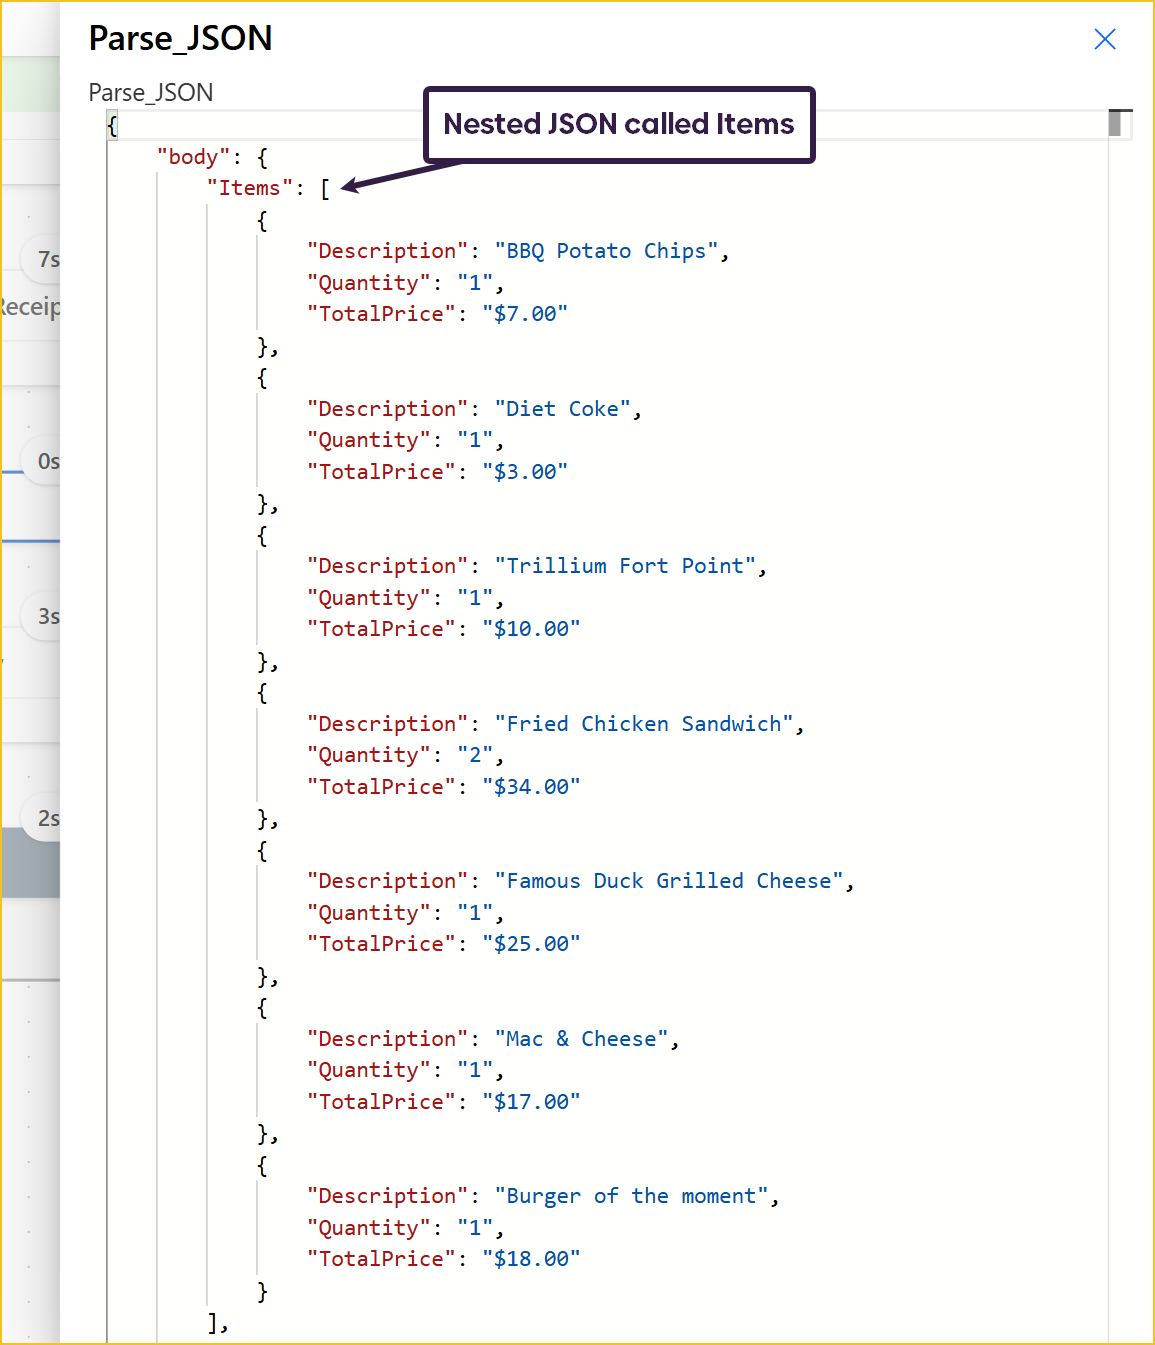
The outputs of this action are in a string format. We can use a ‘Parse JSON’ action so that we can easily use the extracted data. The JSON schema being used includes all the possible data fields that can be extracted from the receipt. However, there is only one required field. This ensures the process is dynamic, so if data is missing from one receipt the action won’t fail.
{
    "type": "object",
    "properties": {
        "Items": {
            "type": "array",
            "items": {
                "type": "object",
                "properties": {
                    "Description": {
                        "type": "string"
                    },
                    "Quantity": {
                        "type": "string"
                    },
                    "TotalPrice": {
                        "type": "string"
                    }
                },
                "required": [
                    "Description"
                ]
            }
        },
        "MerchantName": {
            "type": "string"
        },
        "MerchantAddress": {
            "type": "string"
        },
        "MerchantPhoneNumber": {
            "type": "string"
        },
        "Subtotal": {
            "type": "string"
        },
        "Tip": {
            "type": "string"
        },
        "Total": {
            "type": "string"
        },
        "TotalTax": {
            "type": "string"
        },
        "TransactionDate": {
            "type": "string"
        },
        "TransactionTime": {
            "type": "string"
        }
    }
}
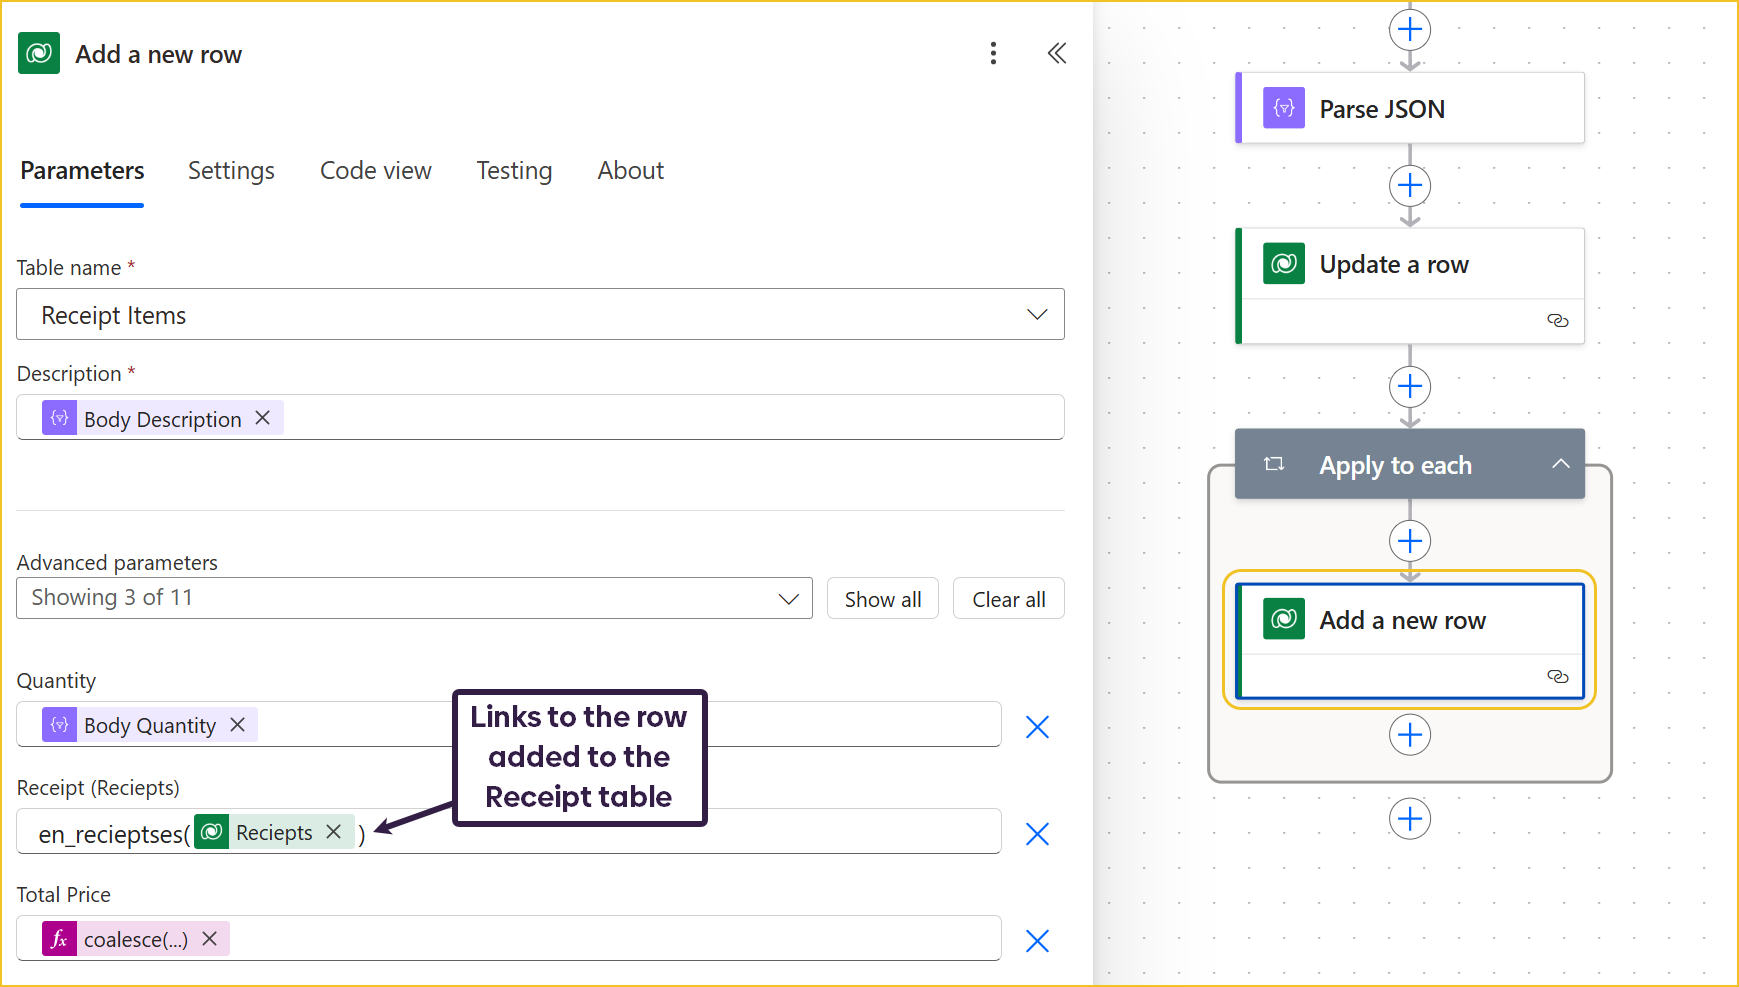
Now we can add the extracted data to Dataverse. We will update the Dataverse row in the Receipts table that triggered the flow. To keep the flow dynamic, we can use the coalesce function. This function allows you to substitute a different value if the one provided is null/blank. So, if one of the fields in the table hasn’t been extracted from the receipt, we will be setting the value to null.
coalesce(body('Parse_JSON')?['MerchantAddress'],null)
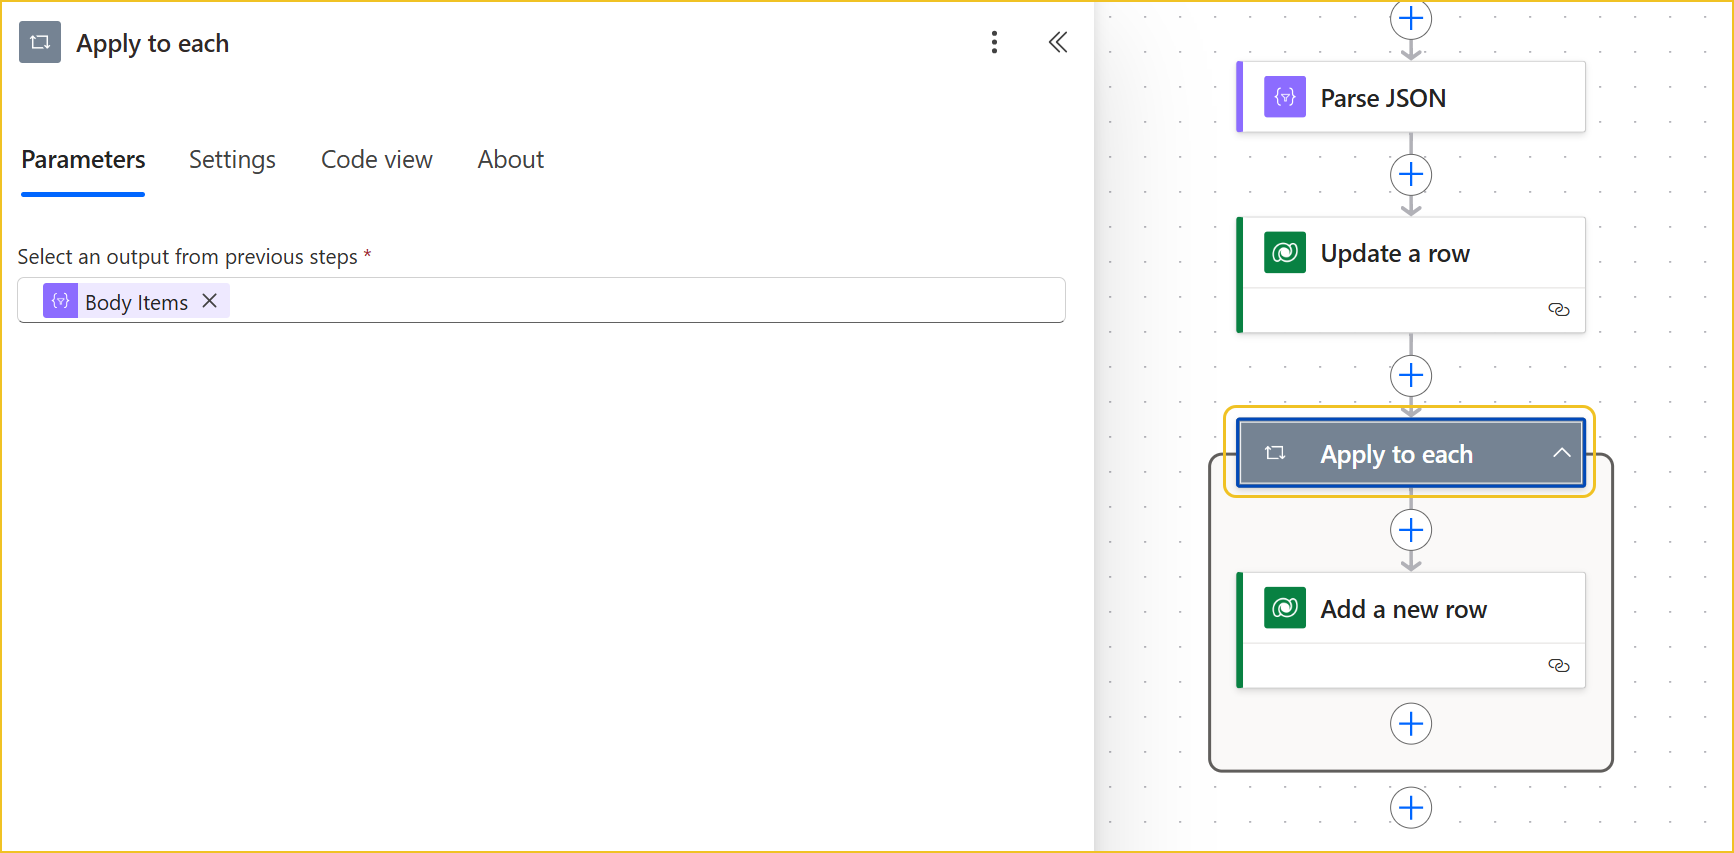
Loop through the Items array using Apply to Each and add a new row to the Receipt Items table for each detected entry.
This solution can be extended by creating a full expense management application. To do this I would:
As with any solution that uses AI, it is important to always have a human check over the AI results. That is why you can view the original uploaded receipt in the app when viewing the extracted data.
Search 200+ Actions to see how Flowr can save you time
Sign up for your free 30-day trial; no cards, catches, or contracts.
Technical Evangelist

