Many of our customers ask us how to build an automated Power Automate flow that will convert all of the documents contained within a SharePoint document set to a single PDF document when the document set is approved or reaches a particular stage within a business process.
Whilst a SharePoint document set is a specific capability in SharePoint, it is simply another SharePoint folder within Power Automate. Thus, a flow merely needs to enumerate the files within a SharePoint folder, then use the Encodian PDF – Merge Specific Files (previously Merge document array to PDF) action to create the PDF document.
This is very simple to configure. However, the slight complexity in the flow is knowing when to trigger and execute it, and when to ignore the trigger. I’ve broken this post into two parts; part one details how to create the flow to convert all documents within the document set to PDF, and part two points on configuring the trigger conditions.
For this post, I created a custom document set named ‘Proposal Document Set‘ and added a SharePoint column called ‘Proposal Status‘. This column determines when to trigger the flow, i.e., if the proposal status equals ‘Approved‘, create the PDF document.
If you need further guidance on how to enable Modern document sets in SharePoint, check out the following resources:
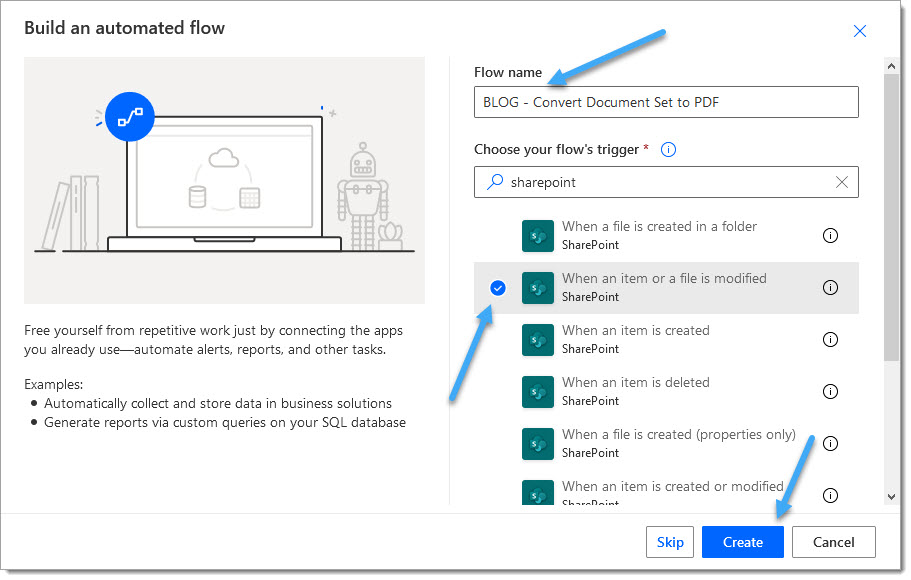
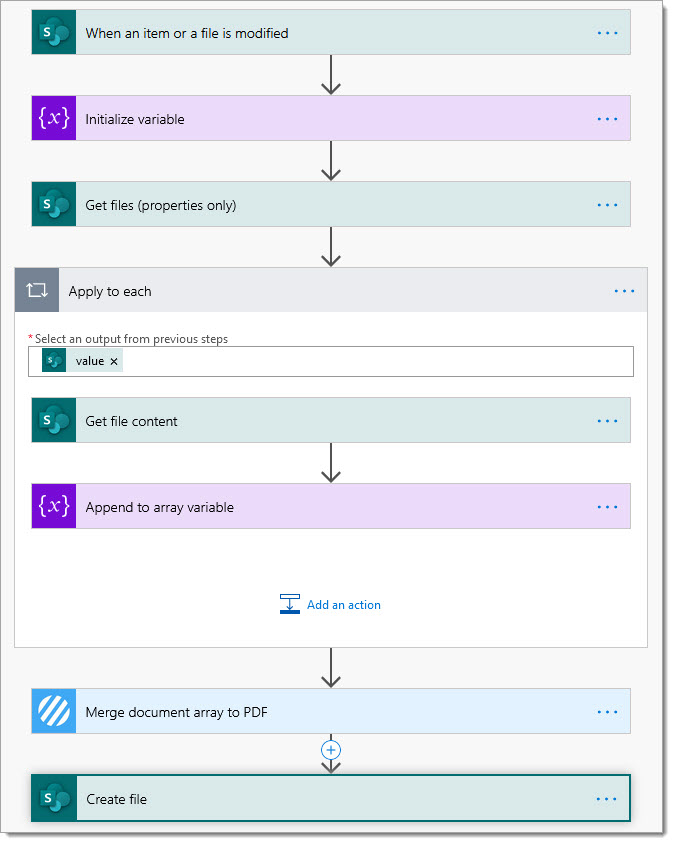
1. Launch Power Automate
2. Create a new Flow using the ‘Automated — from blank‘ option
3. Enter a name for the Flow, select the ‘When an item or file is modified‘ SharePoint trigger, and click ‘Create.‘
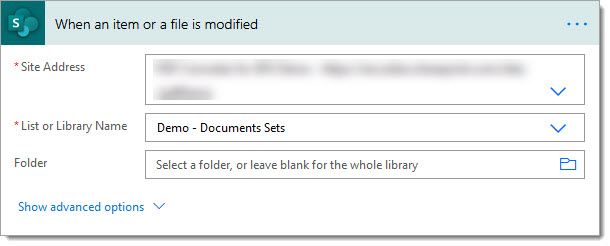
4. Configure the SharePoint ‘When an item or file is modified‘ trigger action
4.a. Site Address: Enter the location of the target SharePoint site
4.b. List Name: Select the target SharePoint list
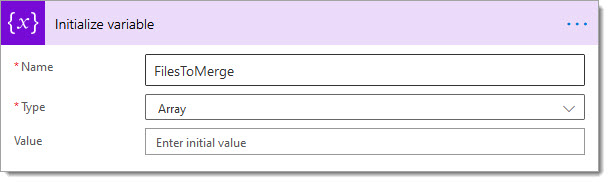
5. Add a ‘Initialize variable‘ action
5.a. Name: Set to ‘FilesToMerge‘
5. b. Type: Select ‘Array‘
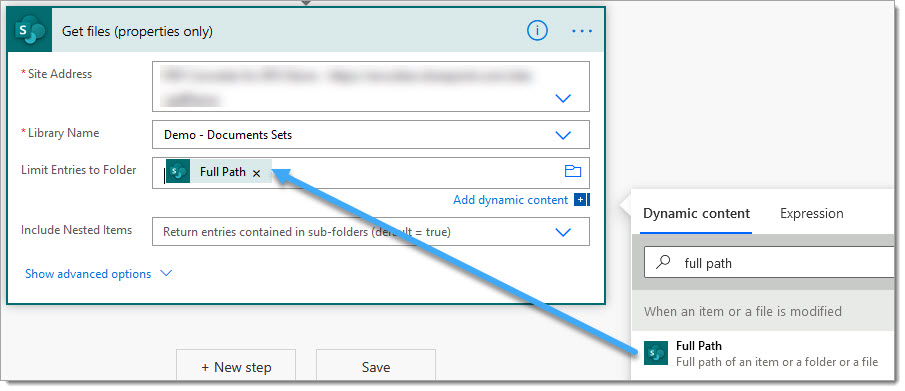
6. Add a SharePoint ‘Get files (properties only)‘ action
6.a. Site Address: Enter the value provided in step 4. a
6. b. Library Name: Enter the value provided in step 4. b
6.c. Limit Entries to Folder: Select the ‘Full Path‘ property provided by the SharePoint ‘When an item or file is modified‘ trigger action
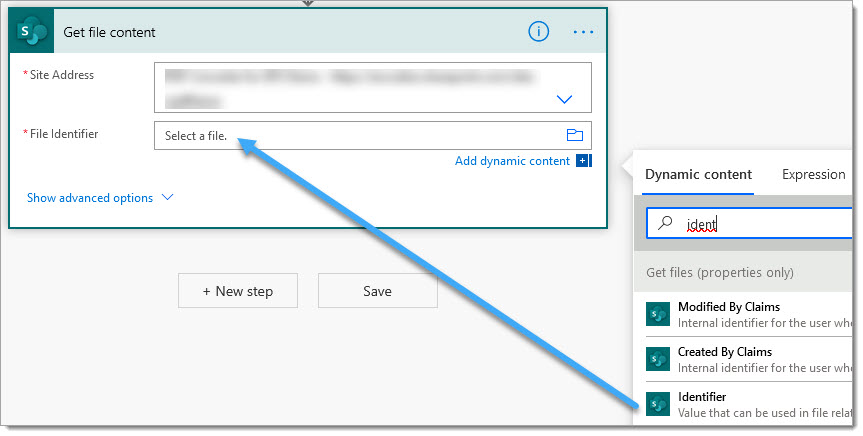
7. Add a SharePoint ‘Get file content‘ action
7.a. Site Address: Enter the value provided in step 4. a
7. b. File Identifier: Select the ‘Identifier’ property provided by the ‘Get files (properties only)‘ action
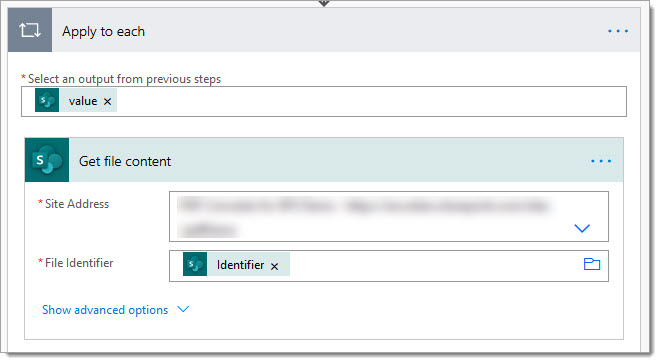
Power Automate will automatically place the SharePoint ‘Get file content‘ action in an ‘Apply to each loop.
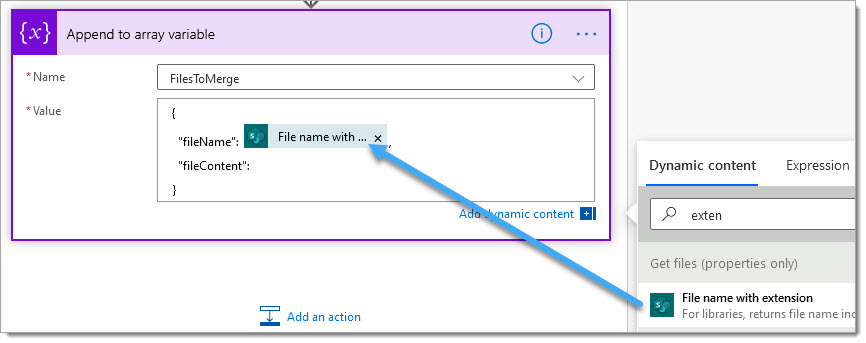
8. Underneath the SharePoint ‘Get file content‘ action; add an ‘Append to array variable‘ action
8.a Name: Select the ‘FilesToMerge’ variable
8.b. Value: Add the following JSON to the ‘Append to array variable‘ variable
 {
   "fileName": ,
   "fileContent":
 }
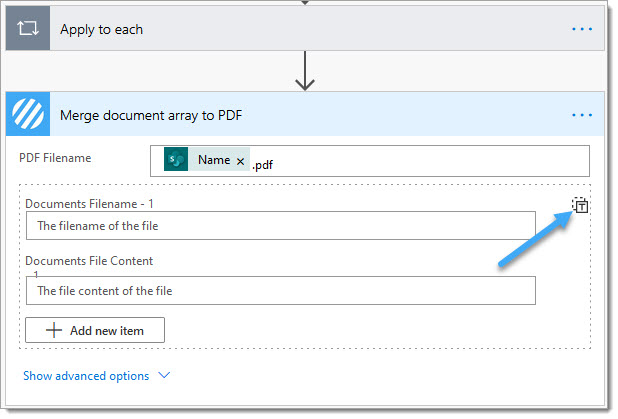
8. c. Place the cursor as per the image and select the ‘File name with extension‘ property from the SharePoint ‘Get files (properties only)‘ action
8.d. Place the cursor as per the image and select the ‘File content‘ property from the SharePoint ‘Get file content‘ action
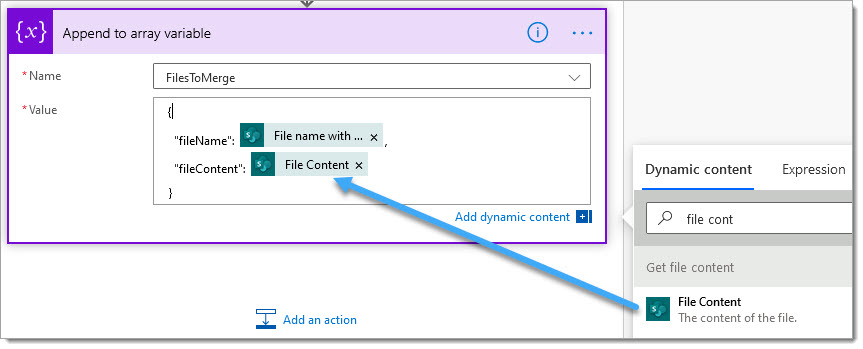
The competed JSON value is as follows:
{
   "fileName": @{items('Apply_to_each')?['{FilenameWithExtension}']},
   "fileContent": @{outputs('Get_file_content')?['body']}
}
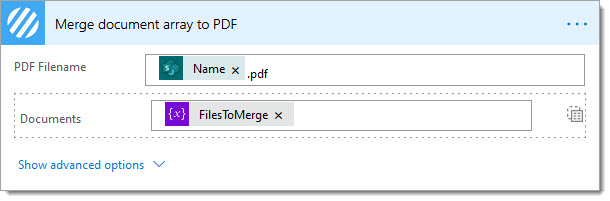
9. Add the Encodian PDF – Merge Specific Files (previously Merge document array to PDF) action underneath the ‘Apply to each‘ action
NOTE: The Encodian action will silently convert non-PDF documents to PDF as part of the merge process.
9.a. PDF Filename: Enter a name for the output PDF document or use dynamic data
9. b. Click the ‘Switch to input entire array‘ icon
9. c. Pass the ‘FilesToMerge’ variable created in step #5
The configuration to create a PDF document from the documents within the document set is complete! Next, you must add actions to your flow to do something with the PDF document. For this example, I’m going to add the file to SharePoint.
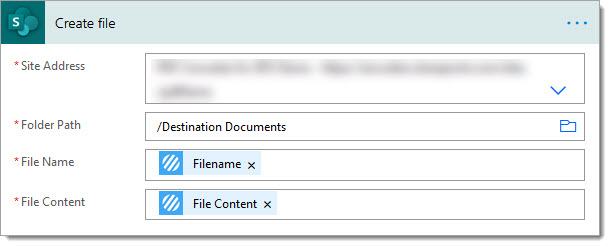
10. Add a SharePoint ‘Create file‘ action
10.a. Site Address: Enter the location of the target SharePoint site
10.b. Folder Path: Select the target SharePoint library/folder
10.c. File Name: Select the ‘Filename‘ property from the PDF – Merge Specific Files (previously Merge document array to PDF) action
10.d. File Content: Select the ‘File Content‘ property from the PDF – Merge Specific Files (previously Merge document array to PDF) action
Your Flow is now complete. We now need to add trigger conditions!
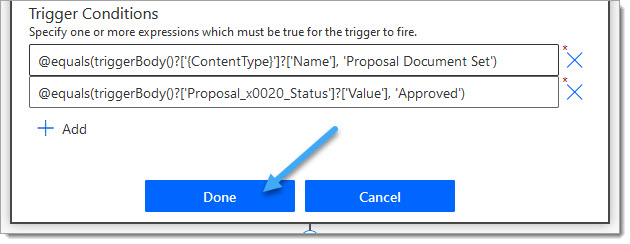
To ensure the flow is only triggered when the proposal document set is approved, I will add the following two trigger conditions:
Trigger Condition – Only the ‘Proposal Document Set‘ Content Type
@equals(triggerBody()?['{ContentType}']?['Name'], 'Proposal Document Set')
Trigger Condition – Only where the ‘Proposal Status‘ field equals ‘Approved.‘
@equals(triggerBody()?['Proposal_x0020_Status']?['Value'], 'Approved')
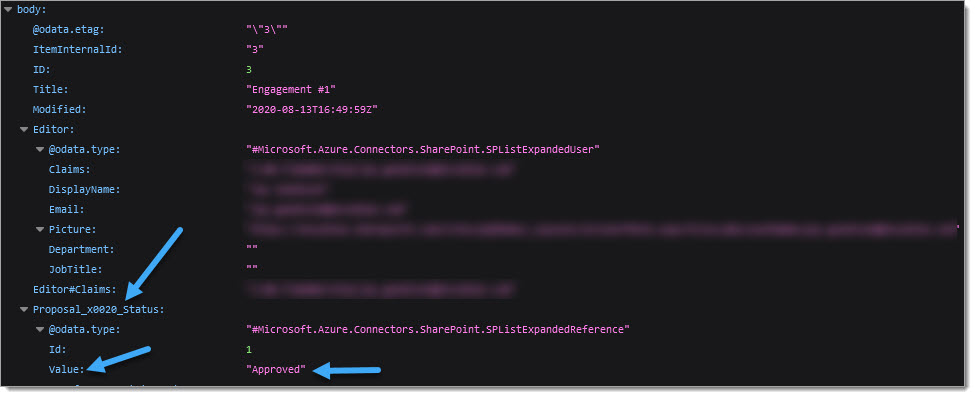
The ‘Proposal Status‘ column is of type ‘Choice‘, and the configuration of the trigger action conforms to how the data is passed in the trigger.
To verify the data passed in your trigger action, go to the run history of your flow, select the trigger action and click OUTPUTS > ‘Click to download.‘
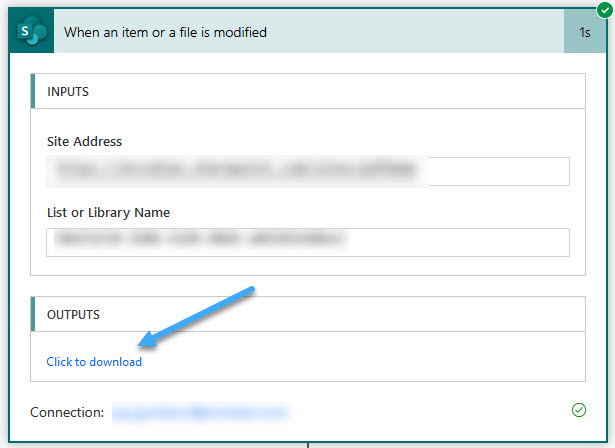
This will download the JSON payload returned by the trigger action, which you can use to determine where the data is located to build your trigger conditions:
To add the trigger actions, execute these simple steps:
1. Select the trigger action, click ‘…’, and click ‘Settings.‘
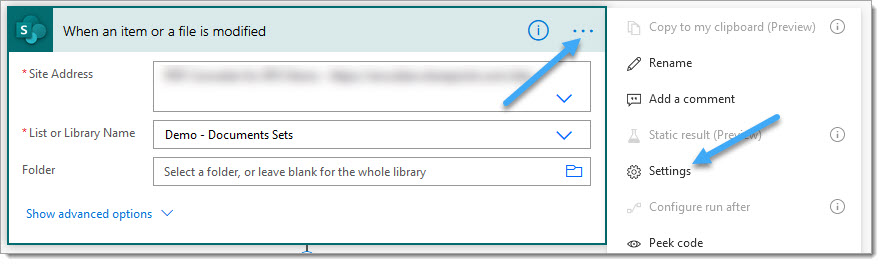
2. Scroll to the ‘Trigger Conditions‘ section and click ‘Add.‘

3. Add your trigger condition and repeat for additional trigger conditions; click ‘Done.‘
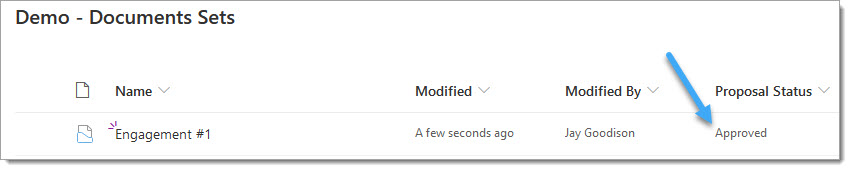
Your Flow should now be ready for testing, and you’ll need to trigger your flow according to your SharePoint document set and flow trigger conditions. For this example, I have just set the document sets ‘Proposal Status‘ column value to ‘Approved‘:
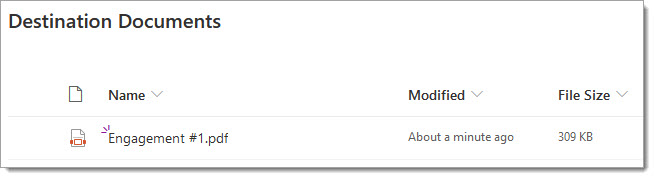
After your flow has run, you should see the PDF document created from the documents contained within the document set added to SharePoint:
Hopefully, this post provides an excellent example that you can use to create your own flows to convert your custom document sets and contained documents to a single PDF document.
We hope you’ve found this guide useful. As ever, please share any feedback or comments. All are welcome!
UPDATE: We’re excited to announce some significant updates to Flowr for Power Automate! As of October 2024, we’ve improved by updating action names and splitting Flowr’s central Power Automate connector into nine specialized connectors. These changes will make your workflow faster, smoother, and more efficient. The new action names are more precise and intuitive, saving you time, while the focused connectors enhance performance and flexibility. This update also helps future-proof the platform for even more powerful features. Check out our updated action names blog.
Managing Director

