UPDATE 17th October 2022 – For creating new documents, we recommend using the Encodian ‘Word – Populate (previously Populate Word Document) action as detailed within this post: Populate a Word or PDF Document using Power Automate V2
An everyday use case for Power Automate is to create new Word documents populating them with data upon creation.
The Microsoft Word Online (Business) premium connector allows you to do precisely this! You can create a Word template which contains controls that the connector can use to insert data upon creation dynamically. Cool!
However, this approach doesn’t work for documents that already exist or where you need to populate a document with data as part of a process. And what happens when you need to amend a PDF document? Well, we have you covered with the following actions:
We’re not going to cover how to use the PDF – Fill Form (previously Fill a PDF Form) action in this post, but we will release a post shortly covering this.
The File – Search and Replace Text and File – Replace Text with Image actions search the contents of either a Word or PDF document and replace targeted phrases with the supplied text or an image. You can also use regex expressions to execute complex find and replace operations.
For example, you could search a document for [APPROVALDATE] and replace it with 15th May 2020.
In short, these actions can be used as an alternative to the Microsoft Word Online (Business) premium connector. You add text placeholders into your document as opposed to control (much simpler) with the added benefit that the Encodian action can replace data in a document at any time, not just upon creation!
To demonstrate the capabilities of these actions, we’ve created a clear Flow snapshot for your review.
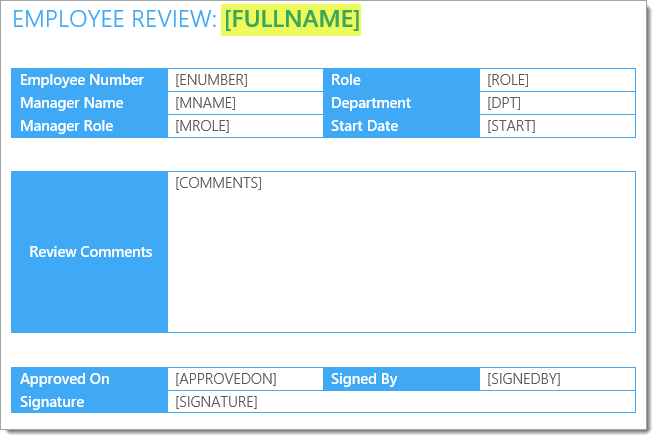
The example is based upon this simple employee review document; we’ll replace the following highlighted field initially:
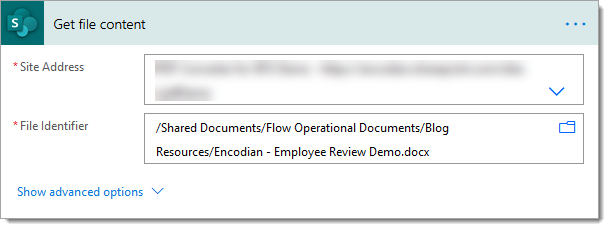
1. Within your Flow, obtain the Word document using a ‘Get File Content‘ action appropriate to where the document is stored – this example uses the SharePoint action.
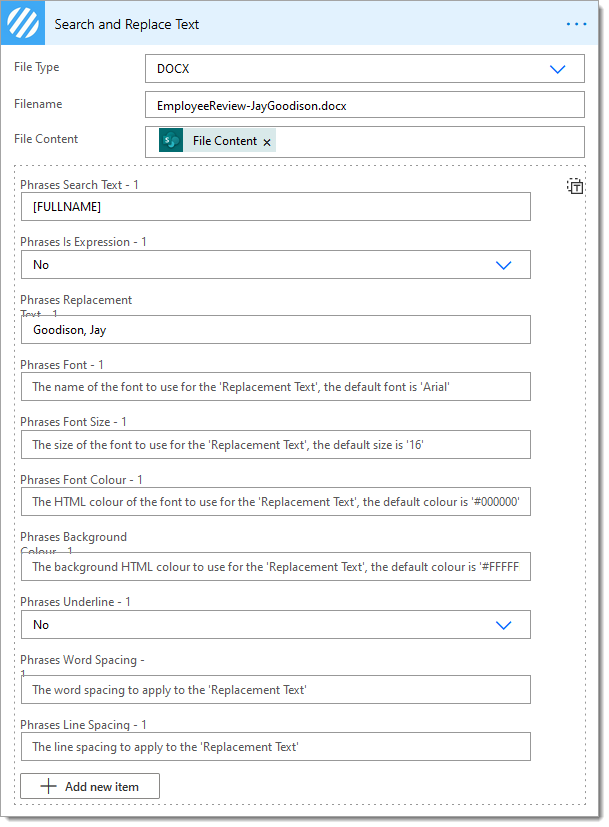
2. Add the Encodian ‘File – Search and Replace Text‘ action
2.a. File Type: Select ‘DOCX‘
2. b Filename: Enter the filename either manually or using dynamic data
2. c File Content: Select the ‘File Content‘ property from the relevant action used in step #1
2.d. Phrases Search Text – 1: Enter [FULLNAME]
2.e. Phrases Is Expression – 1: Select ‘No‘
For Phrases Is Expression – 1, If you select ‘Yes‘, the ‘ Phrases Search Text – 1‘ will be treated as a regular expression.
2. f. Phrases Replacement Text – 1: Enter either a value from dynamic data or manually type
2. g. For the remaining fields, remove the default values required to allow the document styles to be inherited.
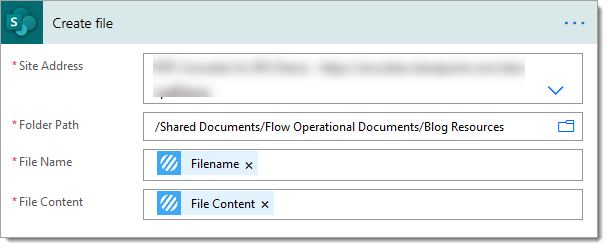
The Encodian ‘File – Search and Replace Text‘ action will return the Word document with the required changes. You must then add actions to perform your designated steps with the updated file. For this example, we’ll use the SharePoint ‘Create file‘ effort to add the updated file to SharePoint.
3. Add a SharePoint ‘Create file‘ action
3.a. Site Address: Set to the value of the SharePoint site, which contains the target document library
3.b. Folder Path: Set to the value of the target SharePoint folder
3.c. File Name: Select the ‘Documents Filename‘ property from the ‘Search and Replace Text‘ Encodian action
3.d. File Content: Select the ‘Documents File Content‘ property from the ‘Search and Replace Text ‘ Encodian action
Upon executing the Flow, you should see the new values within your document:

Our Flow is replacing a single value; we’re now going to extend the Flow to replace multiple values. The Encodian ‘File – Search and Replace Text‘ action allows multiple searches and replace configurations to be added to a single action:
4. Select the Encodian ‘File – Search and Replace Text‘ action, and click ‘Add new item.‘

5. Configure the configuration item as required (see step #2 for guidance).
Re-run the flow, and the document should reflect all of the searches and replace configuration items provided
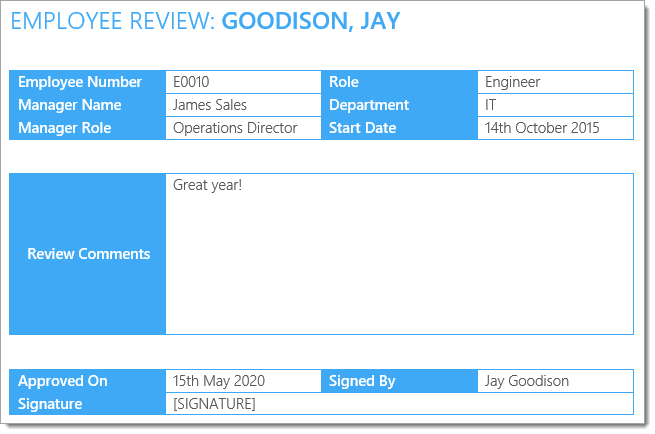
Our final task for this example is to replace the signature placeholder with a signature image.

6. Directly after the Encodian ‘File – Search and Replace Text‘ action, add an Encodian File – Replace Text with Image action.
6.a. File Type: Select ‘DOCX‘
6. b. Filename: Select the ‘Documents Filename‘ property from the ‘Search and Replace Text‘ Encodian action
6.c. File Content: Select the ‘Documents File Content‘ property from the ‘Search and Replace Text ‘ Encodian action
6.d. Search Text: Enter [SIGNATURE]
The Encodian ‘File – Search and Replace Text‘ action requires an image file to be passed to the action. Use any Power Automate ‘Get file content’ type action to obtain the required image file.
6.e. Image Filename: Either enter manually or provide via dynamic data
6. f. Image File Content: Select the ‘File Content‘ property from the relevant action used
If you need to resize the image, compress the image or change the image file format, please review the following Encodian actions: Image – Resize (previously Resize an Image), Image – Compress (previously Compress an Image) and Convert – Image.
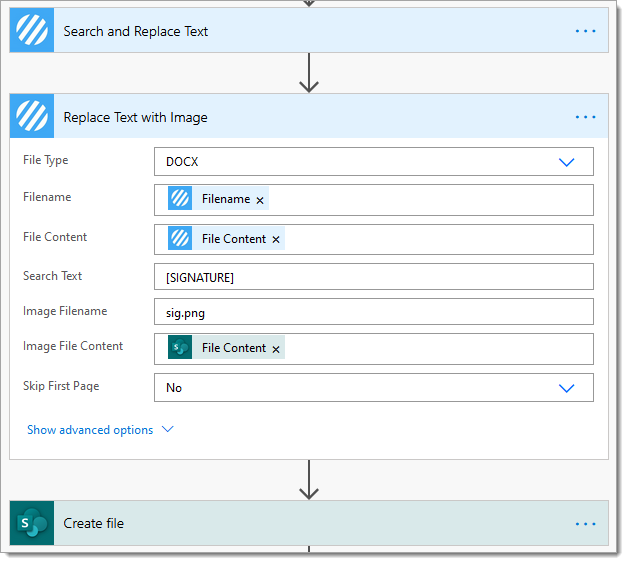
7. Make sure to update your following actions (Create a file in this example) to utilise the ‘File Contents‘ property from the Encodian File – Replace Text with Image action
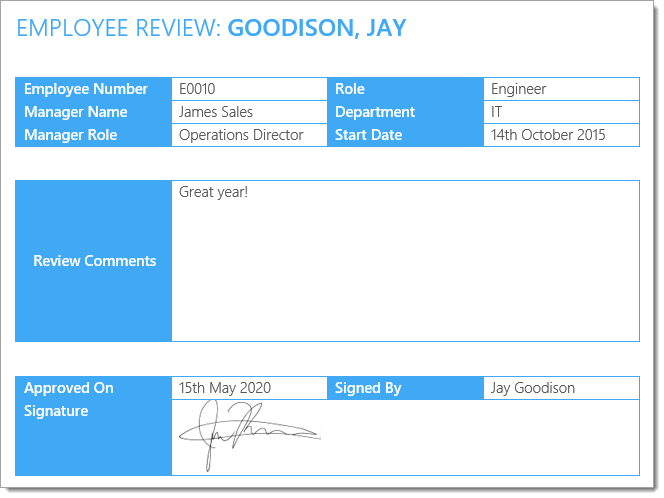
The document should now contain your text data and the image!
We hope this post provides valuable guidance on using Encodian actions to populate Word and PDF documents. If you’re struggling, please raise a ticket with our support team, who’ll be delighted to help.
… and please share any feedback or comments – all are welcome 🙂
UPDATE: We’re excited to announce some significant updates to Flowr for Power Automate! As of October 2024, we’ve improved by updating action names and splitting Flowr’s central Power Automate connector into nine specialized connectors. These changes will make your workflow faster, smoother, and more efficient. The new action names are more precise and intuitive, saving you time, while the focused connectors enhance performance and flexibility. This update also helps future-proof the platform for even more powerful features. Check out our updated action names blog.
Managing Director