Want to know how to resize and compress Power Apps Images with Power Automate? Well, you’re in luck!
Many of our customers are utilizing the ‘Camera Control’ within PowerApps to capture images. These images are typically very large which can create several challenges when storing and using those images downstream.
This blog post shows how images captured with the PowerApps ‘Camera Control’ can be easily compressed and/or resized using Encodian’s ‘Image – Compress’ (previously Compress an Image) and ‘Image – Resize‘ (previously Resize an Image) actions and stored within a SharePoint library using Microsoft Power Automate.
1. Launch Power Apps
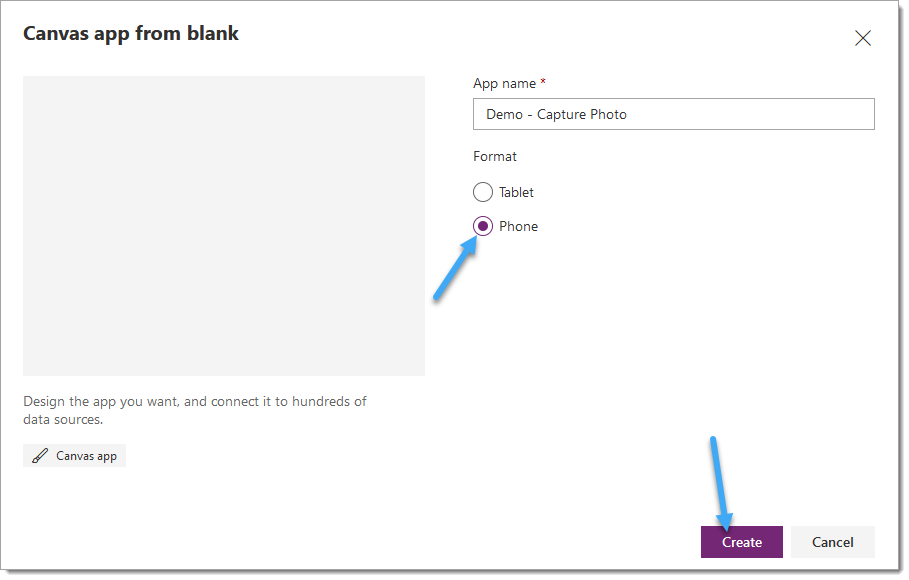
2. Click ‘Canvas App from Blank‘

3. Enter the required information:
3.a. App Name: Enter a name for your application
3.b. Format: Select ‘Phone‘
3.c. Click ‘Create‘
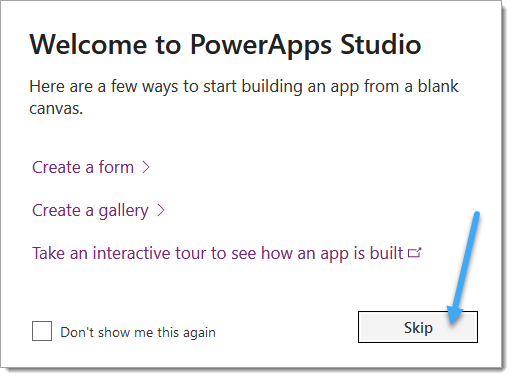
4. If this message is displayed, click ‘Skip‘
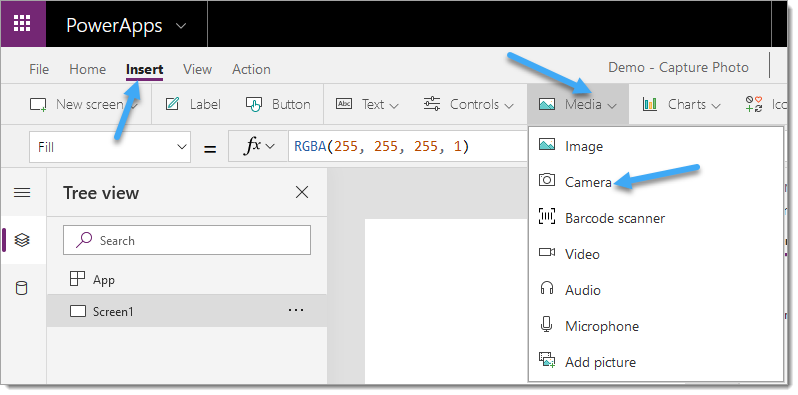
5. Click ‘Insert‘ > ‘Media‘ > ‘Camera‘
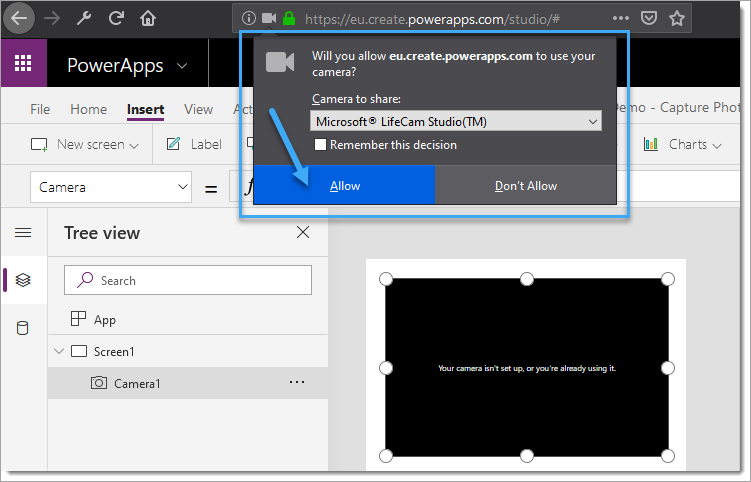
6. If prompted, allow Power Apps to use your camera
7. Your camera should now be operational
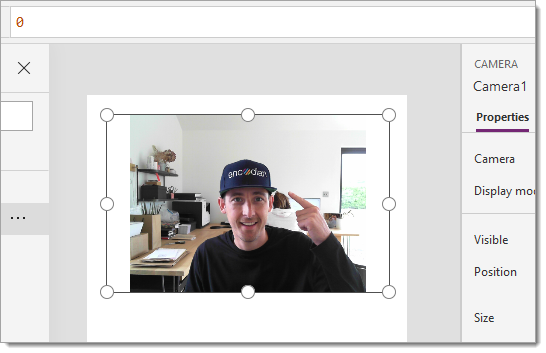
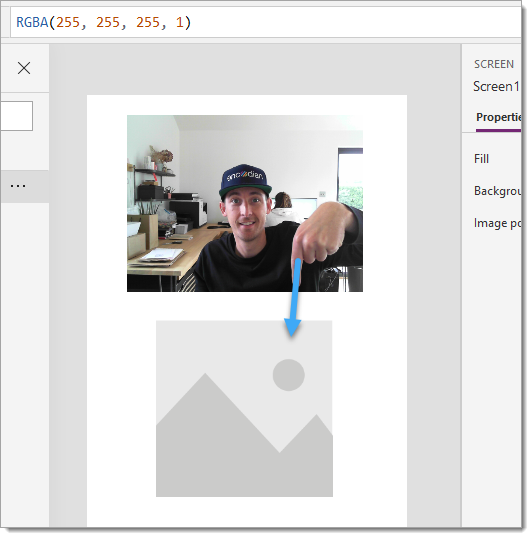
8. Click ‘Insert‘ > ‘Media‘ > ‘Image‘
9. Select the camera control, click the ‘v‘ icon, then click ‘OnSelect‘
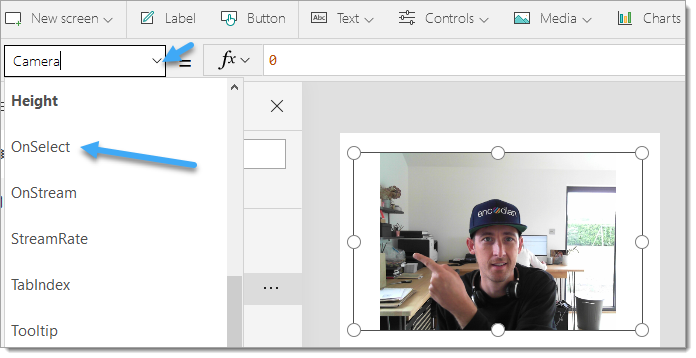
10. Enter the following expression: ClearCollect(photoCollection, Camera1.Photo)
NOTE: This will create an in-memory collection for storing images taken with the camera control. Further details on the ‘ClearCollect‘ function are documented in the following article: https://docs.microsoft.com/en-us/powerapps/maker/canvas-apps/functions/function-clear-collect-clearcollect

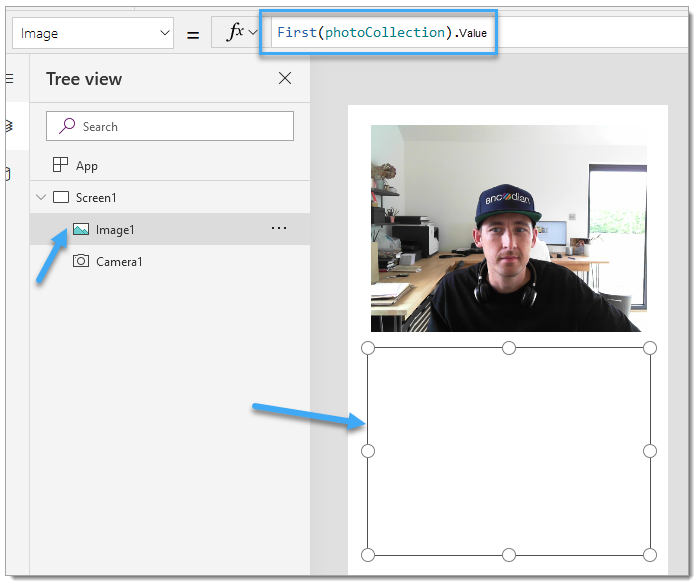
11. Select the image control and enter the following expression: First(photoCollection).Value
NOTE: This expression selects the first image from the collection used by the Camera control to store images. Further details on the ‘First‘ function located here: https://docs.microsoft.com/en-us/powerapps/maker/canvas-apps/functions/function-first-last
We now need to create a Flow to process the captured image and store within SharePoint, we’ll later revisit the PowerApp to add a submit button which will invoke the required Flow.
1. Launch Power Automate
2. Click ‘Create‘ > ‘Instant Flow‘
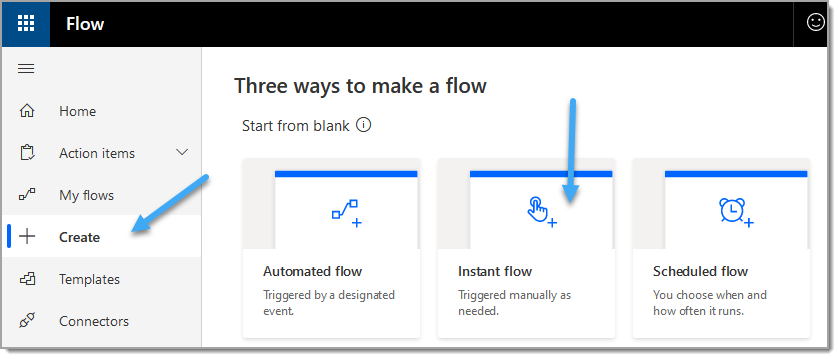
3. Provide the required information:
3.a. Flow name: Enter a relevant name/description for the Flow
3.b. Select ‘From PowerApps‘
3.c Click ‘Create‘
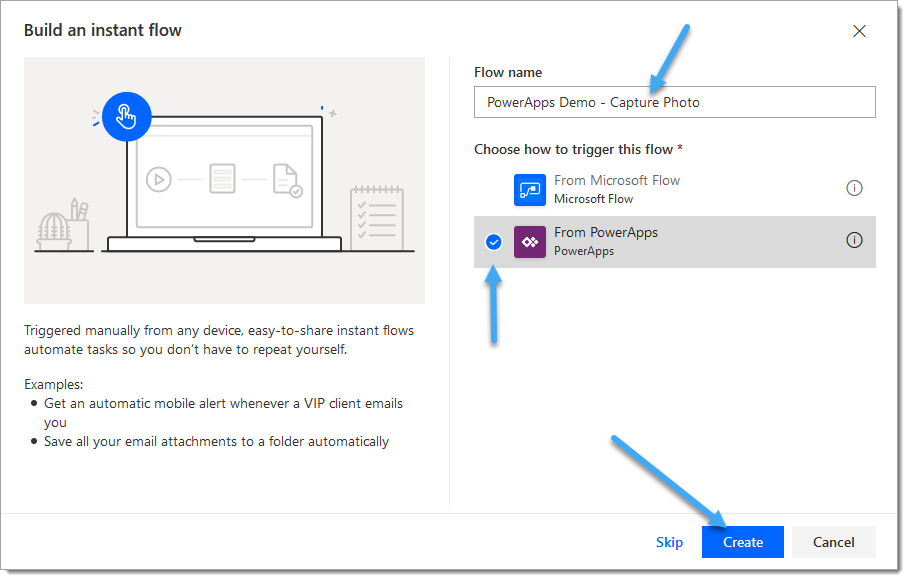
4. Add a ‘Create File‘ SharePoint action
4.a. Site Address: Set to the target SharePoint site
4.b. Folder Path: Set to the target SharePoint library/folder
4.c. File Name: Select the ‘Ask in Power Apps’ property

4.d. File Contents: Click ‘See more‘
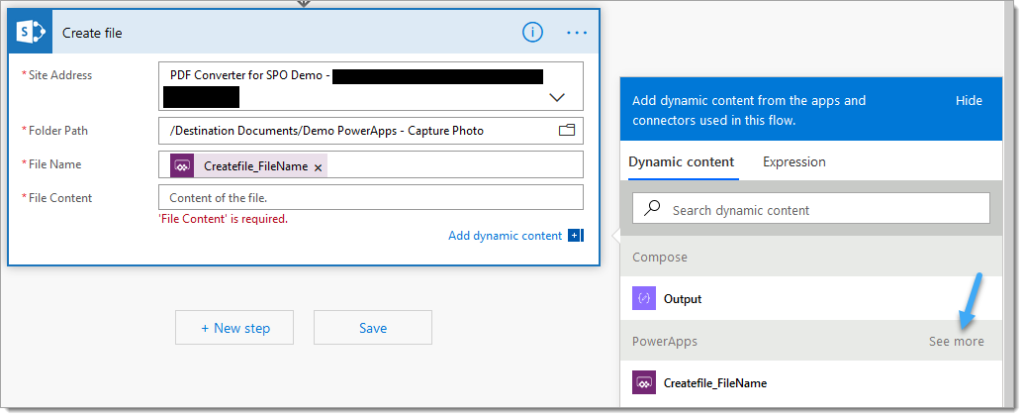
4.e. File Contents: Select the ‘Ask in Power Apps‘ property
5. Add a ‘Compose‘ data operations action above the ‘Create File‘ action.
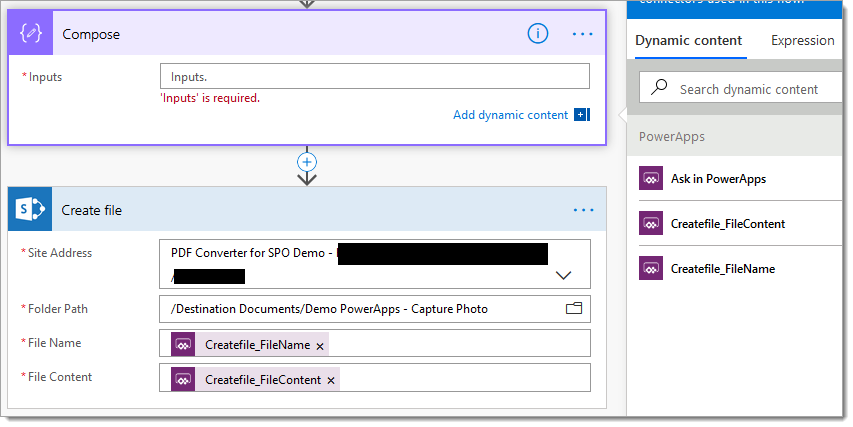
NOTE: The image sent from PowerApps is sent as a data URI; we need to extract just the Base64 string which represents the file.
6. Select the ‘Input’ field, enter the following expression: dataUriToBinary(triggerBody()[‘Createfile_FileContent’])

7. Select the ‘Create file‘ SharePoint action.
7.a. File Content: Remove the ‘Createfile_FileContent‘ property

7.b. File Content: Change to the ‘Output‘ property of the ‘Compose‘ action

8. Ensure you have saved all changes to the Flow. The next task is to configure the PowerApp to invoke the Flow.
1. Return to the Power App
2. Click ‘Insert‘ > ‘Button‘
3. Resize the button control as required
NOTE: I have also set a background colour on the image control so I can see the default placement.
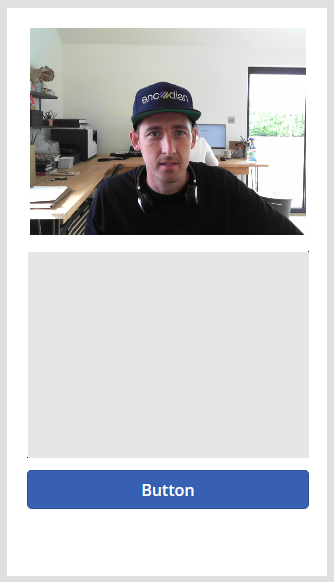
4. Select the button control
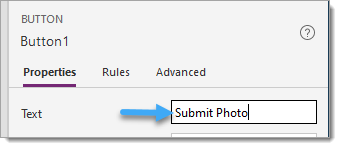
4.a. Set the ‘Text‘ property to ‘Submit Photo‘ or similar
4.b. Click ‘Action‘ > ‘Flows‘
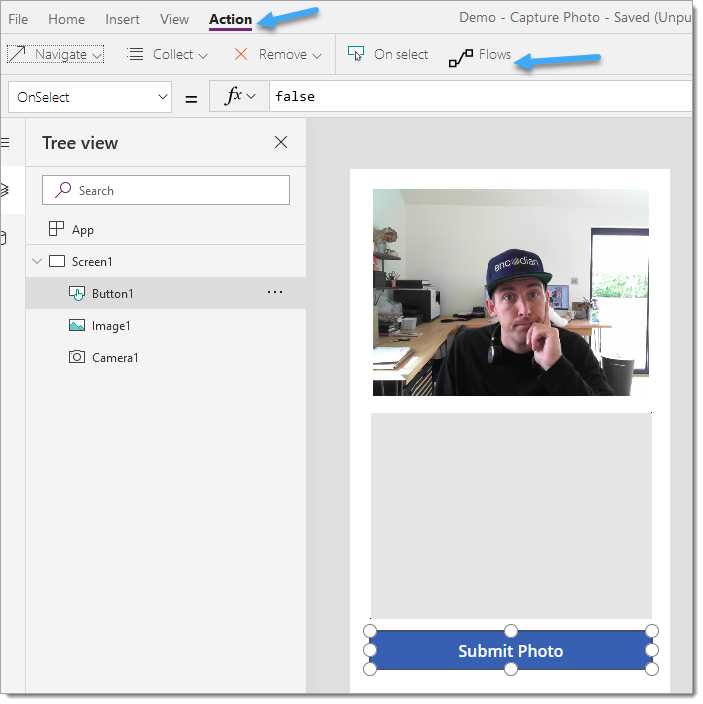
4.c. Select the previously created Flow

4.d. Complete the expression as prompted within PowerApps by providing the requested data, for example: PowerAppsDemo-CapturePhoto’.Run(Concatenate(“PowerApps-“,Text(Rand()),”.png”),First(photoCollection).Value)
NOTE: The Concatenate expression is used to help create a unique filename by injecting the Text(Rand()) result into the string. More details on these functions can be found here: https://docs.microsoft.com/en-us/powerapps/maker/canvas-apps/functions/function-text and https://docs.microsoft.com/en-us/powerapps/maker/canvas-apps/functions/function-rand
5. We are now ready to test the PowerApp and Flow! Click the play button

6. Click the camera control to capture an image, then click ‘Submit Photo‘

7. The captured image should be processed and added to the target SharePoint library

Now, let’s see if we can reduce the size of the image!
1. Re-open the previously created Flow
2. Before the ‘Create file‘ action add an Encodian ‘Image – Compress‘ (previously Compress an Image) action
2.a. File Content: Select the ‘Output‘ property from the ‘Compose‘ action

3. Image Type: Select ‘PNG‘

4. Select the ‘Create file‘ action
4.b. File Content: Remove the ‘Output‘ property

4.c. File Content: Select the ‘File Content‘ property from the ‘Image – Compress‘ (previously Compress an Image) action

5. Go back to the PowerApp and click ‘Submit Photo‘ to resend the originally captured image. The resulting file should be added to the SharePoint library

NOTE: In this instance compressing the image saved around 10%, but this can range anywhere between 5 to 90% depending on the image content, image format, current optimization, device, etc.
1. Re-open the previously created Flow
2. Before the ‘Image – Compress‘ (previously Compress an Image) action, add an Encodian ‘Image – Resize‘ (previously Resize an Image) action
2.a. Filename: Select the ‘Createfile_FileName‘ property from the ‘PowerApps‘ action
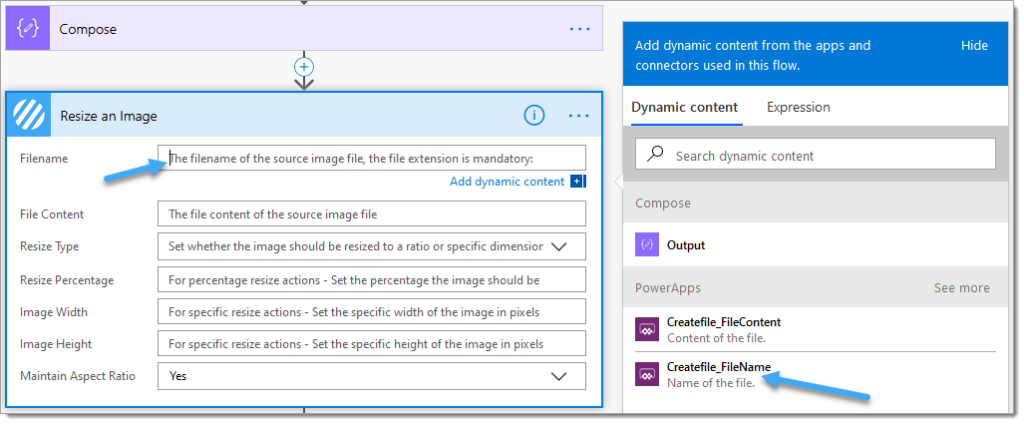
2.b. File Content: Select the ‘Output‘ property from the ‘Compose‘ action

2.c. Resize Type: Select ‘Percentage‘
2.d. Resize Percentage: Set to ‘50‘, which will reduce the image dimensions by 50%.

3. Select the ‘Image – Compress‘ (previously Compress an Image) action
3.a. File Content: Remove the ‘Output‘ property

3.b File Content: Select the ‘File Content‘ property from the ‘Image – Resize‘ (previously Resize an Image) action
4. Go back to the PowerApp and click ‘Submit Photo‘ to resend the originally captured image. The resulting file should be added to the SharePoint library

The final image dimensions were reduced by 50%, and with additional compression the total image size was reduced from 468k to 109k, a 76% reduction.
Hopefully, this post will help you control the dimensions and size of the images generated in your PowerApps!
We hope you’ve found this guide useful, and as ever, please share any feedback or comments – all are welcome!
UPDATE: We’re excited to announce some significant updates to Flowr for Power Automate! As of October 2024, we’ve improved by updating action names and splitting Flowr’s central Power Automate connector into nine specialized connectors. These changes will make your workflow faster, smoother, and more efficient. The new action names are more precise and intuitive, saving you time, while the focused connectors enhance performance and flexibility. This update also helps future-proof the platform for even more powerful features. Check out our updated action names blog.
Managing Director